
This feature aids in the tracking and management of loan and buy items in high security vaults (Onsite and offsite.) and also provides a way for customers to request a “Pick Up” or to have their items moved to a warehouse vault so that their loan can be redeemed. Additionally, customers can pre-pay for their redemption and then pick it up when the item is ready.
Please contact a Bravo representative to learn how to enable the Secure Vault functionality for your store. This functionality is only available in select jurisdictions.
System Configuration
Once this feature has been enabled, there are some things that will need to be setup by the Bravo team before you can begin using it.
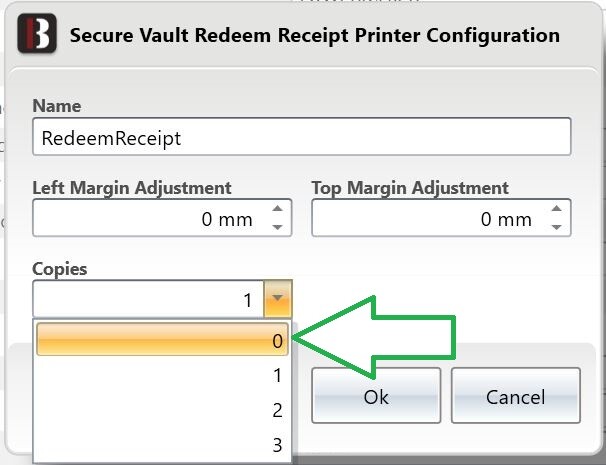
Secure Vault Redeem Receipt printer - This printer can be found under System Configuration > PRINTER CONFIG.
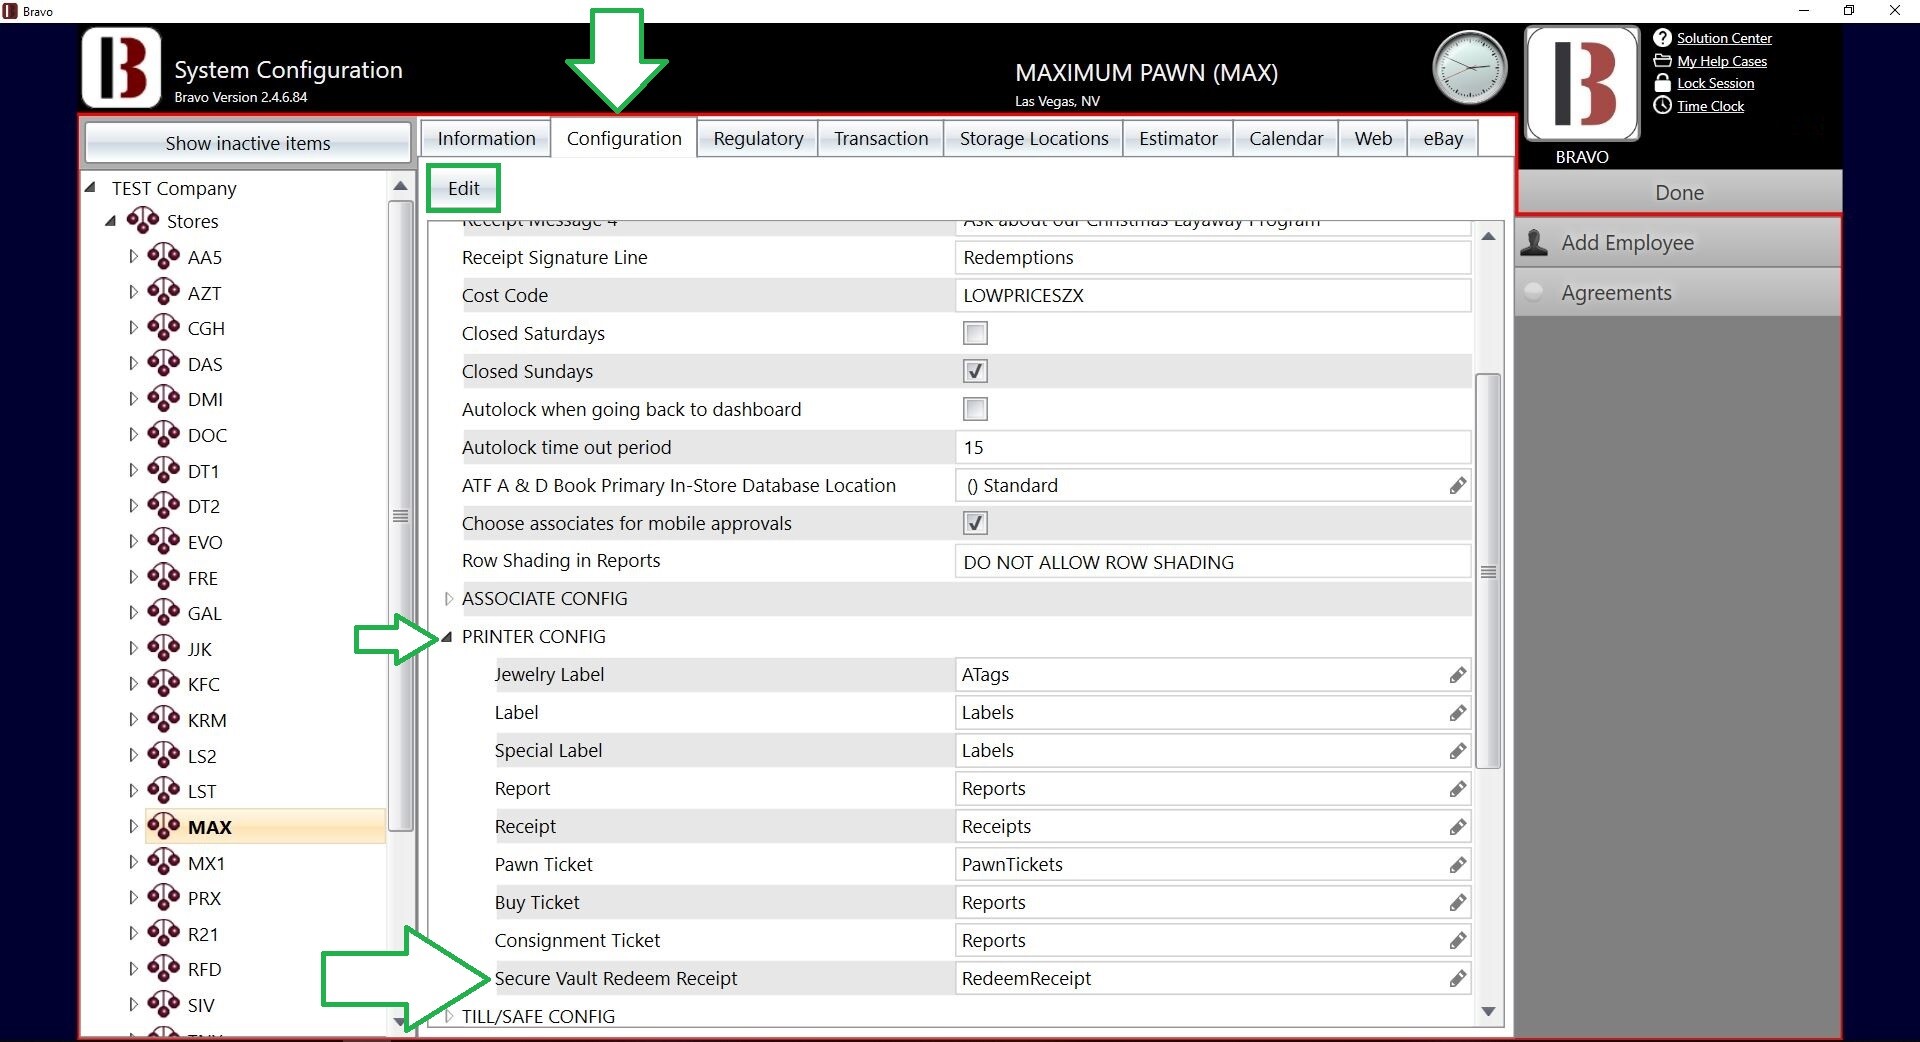
Make sure this printer is setup on all workstations of the store with a local Secure Vault so that the vault manager can allow immediate redemption of items in the Secure Vault. If a store does not wish to print the Secure Vault Redeem Receipt, set the number of copies to zero.
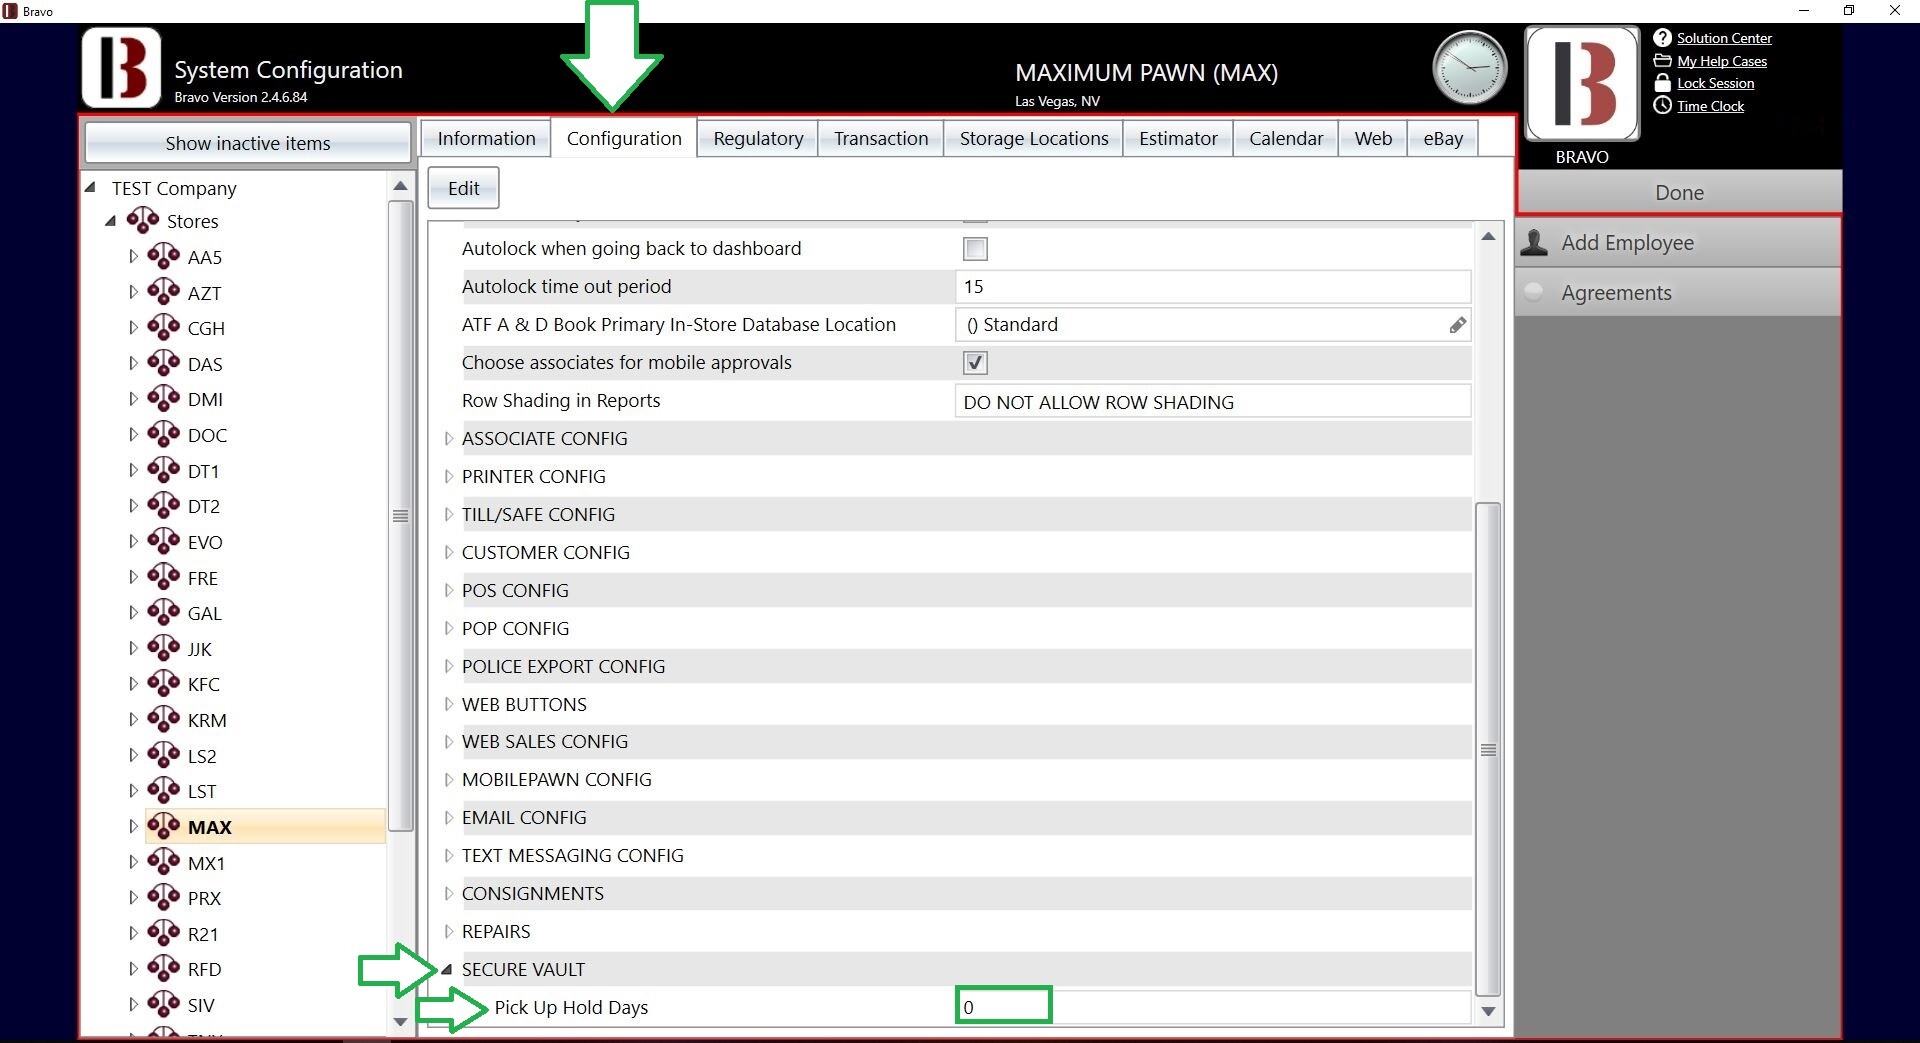
Pick Up Hold Days - Following receipt of loans from the vault, you will be prompted to send loans back to the vault after this number of days if they are not redeemed. Typically this value is set to be one week, or seven days, in length, but can be configured for any number of days.
Hold redeem of loan in a Secure Vault location - In other words: Require vault manager intervention before the loan can be redeemed. Options are: Always. Only when in another store. Never.
Definitions:
- Always = Loans in Secure Vault locations will require the customer to always request a Pick Up in order to redeem their loan.
- When in another store only = Loans that are in Secure Vault locations in this store will be available for immediate redemption without a pick up.
Store of Central Vault - Send items to this store when transferring loans. To do this please give support a call at 702 701 9115 option 3.
Employee Security
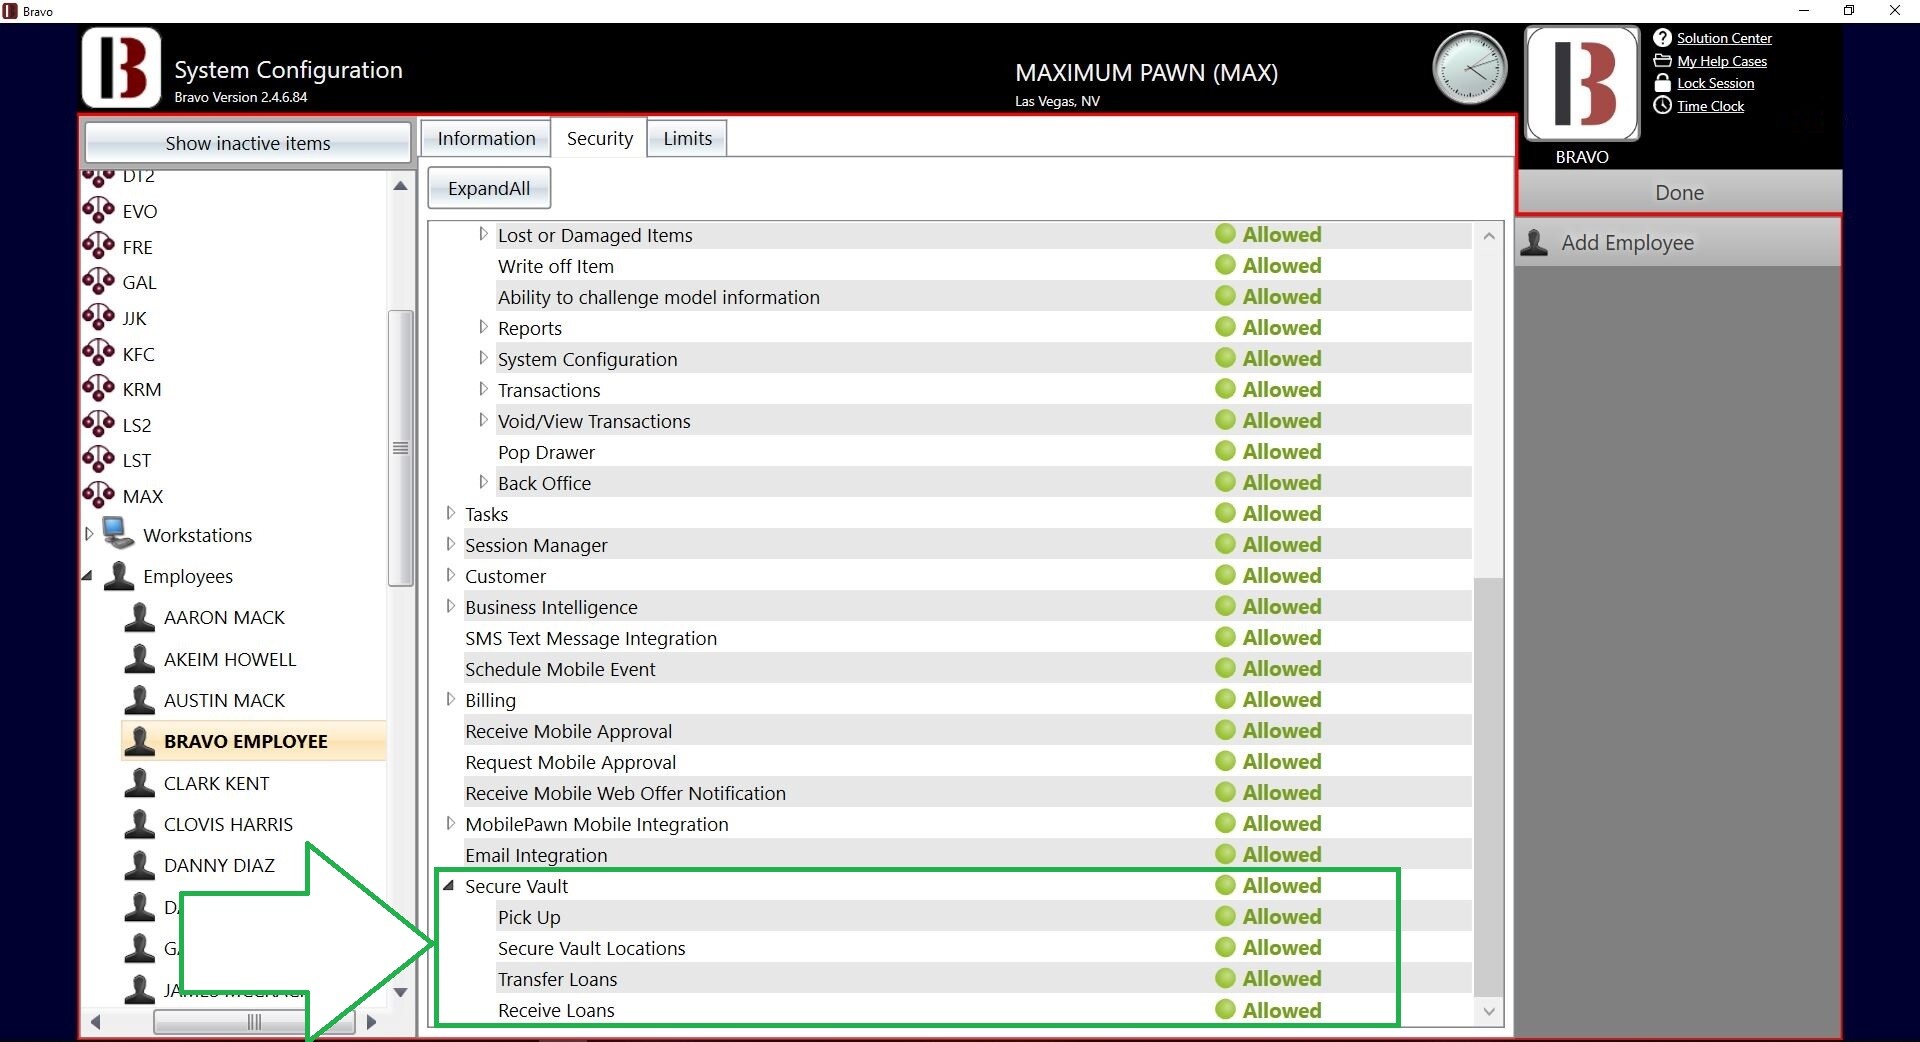
The following security bits must be configured for each user:
- Pick Up - Allow employee to request for loan items to be moved from the Secure Vault to a warehouse location
- Secure Vault Locations - Allow employee to change the location of items in Secure Vault locations
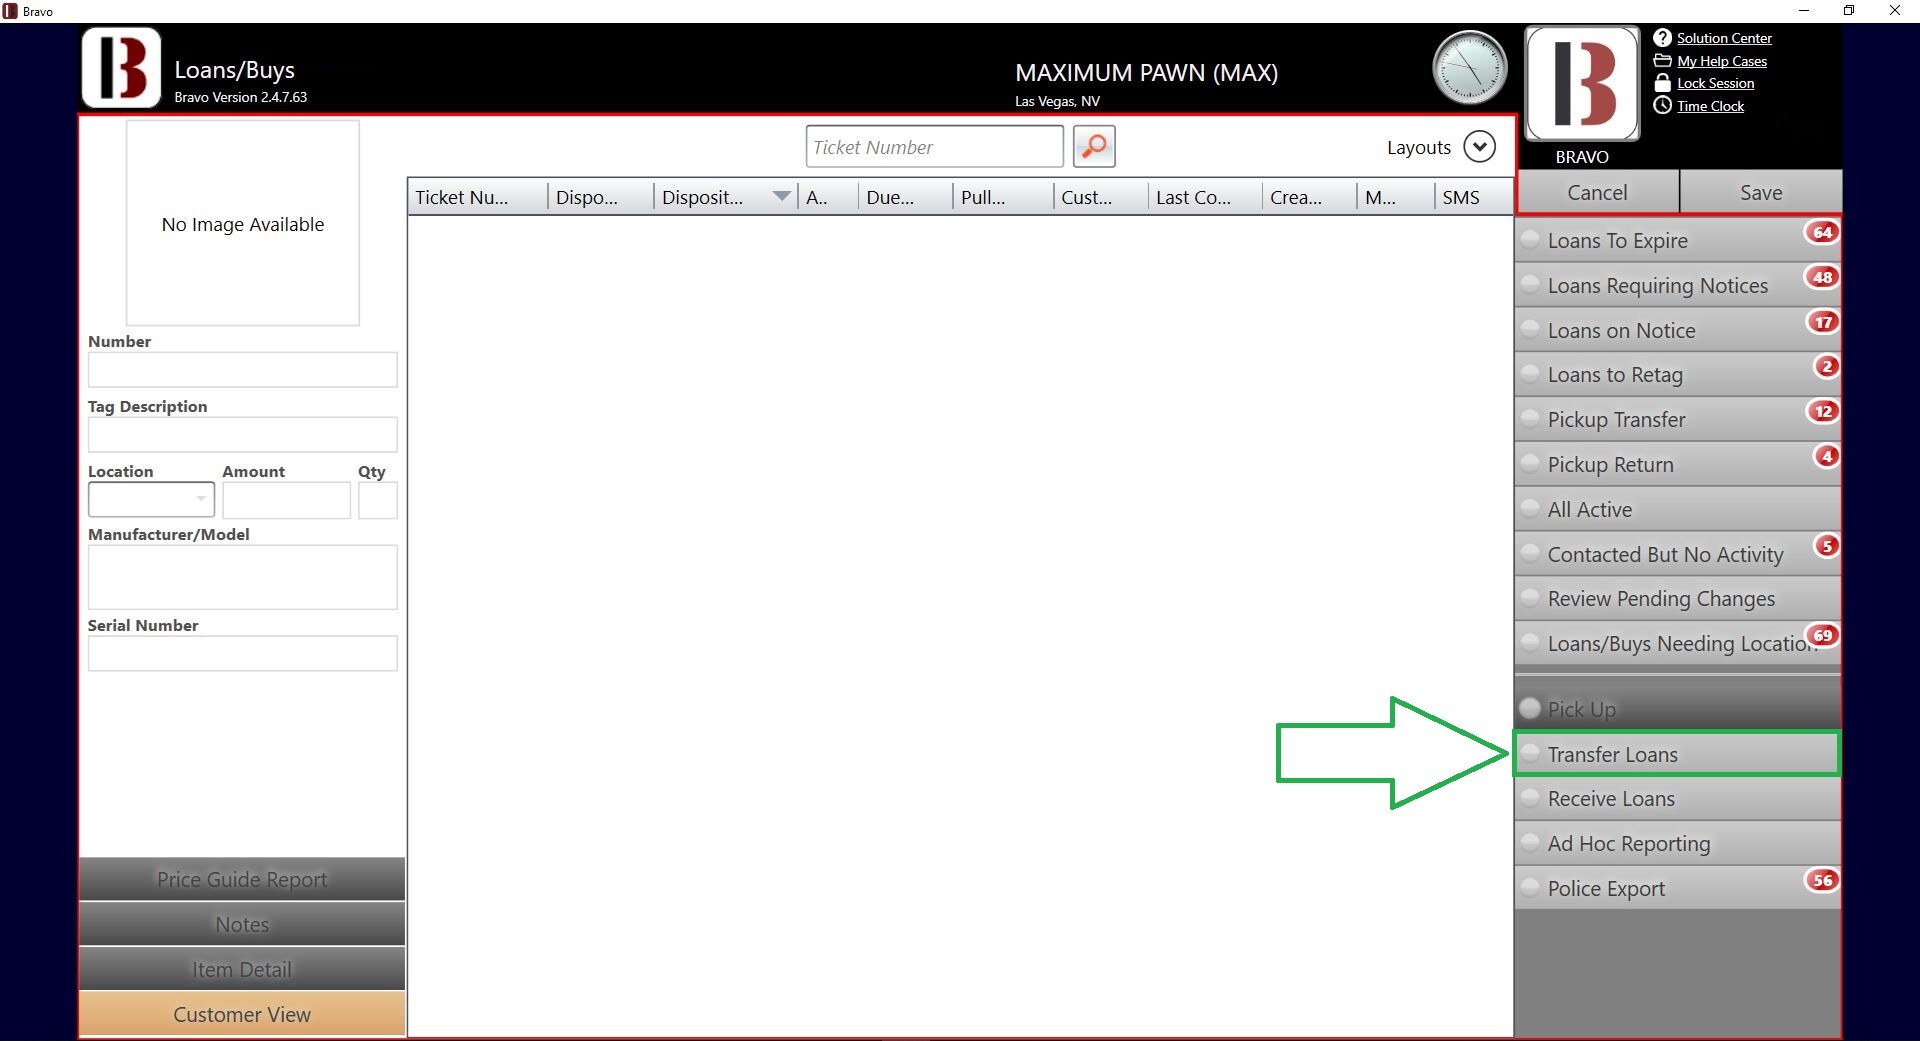
- Transfer Loans - Allow employee to transfer active loans from the originating store to the vault store, or from the vault store back to the originating store
- Receive loans - Allow employee to receive loan transfer batches at either the originating store or at the vault store
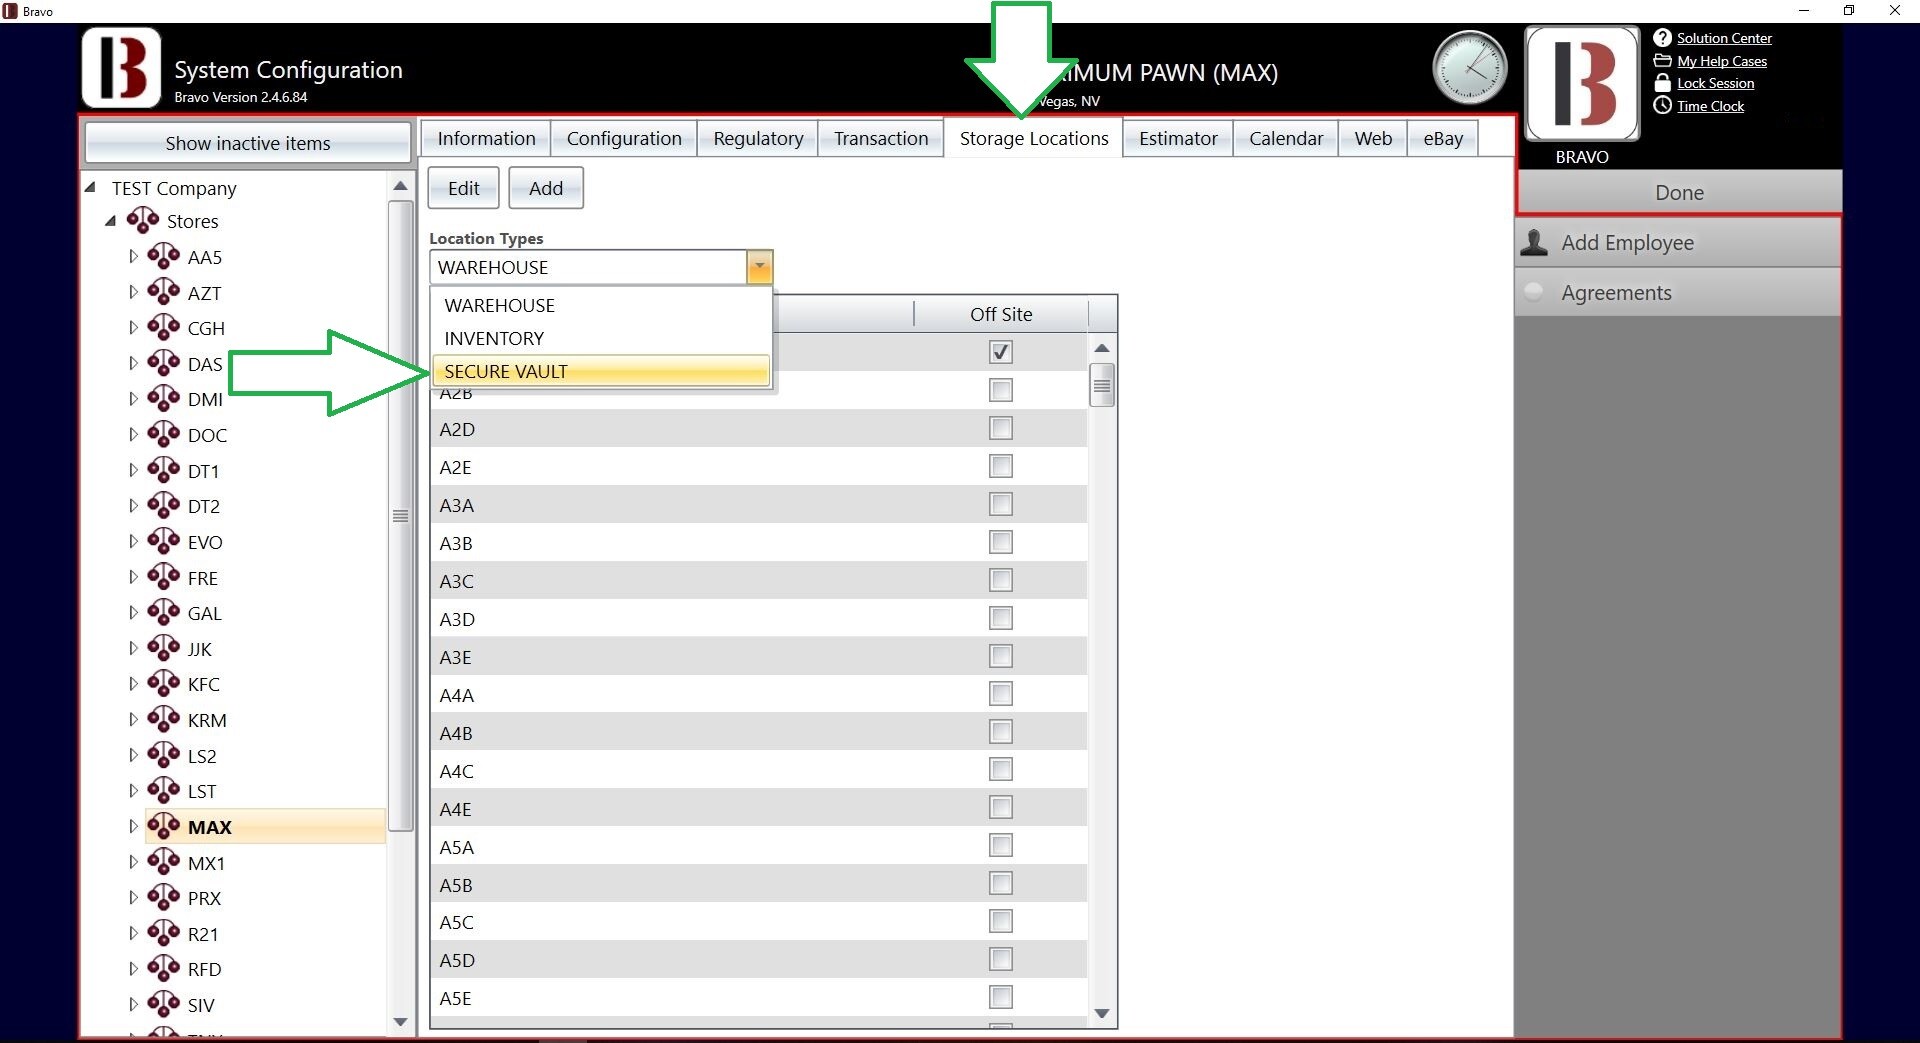
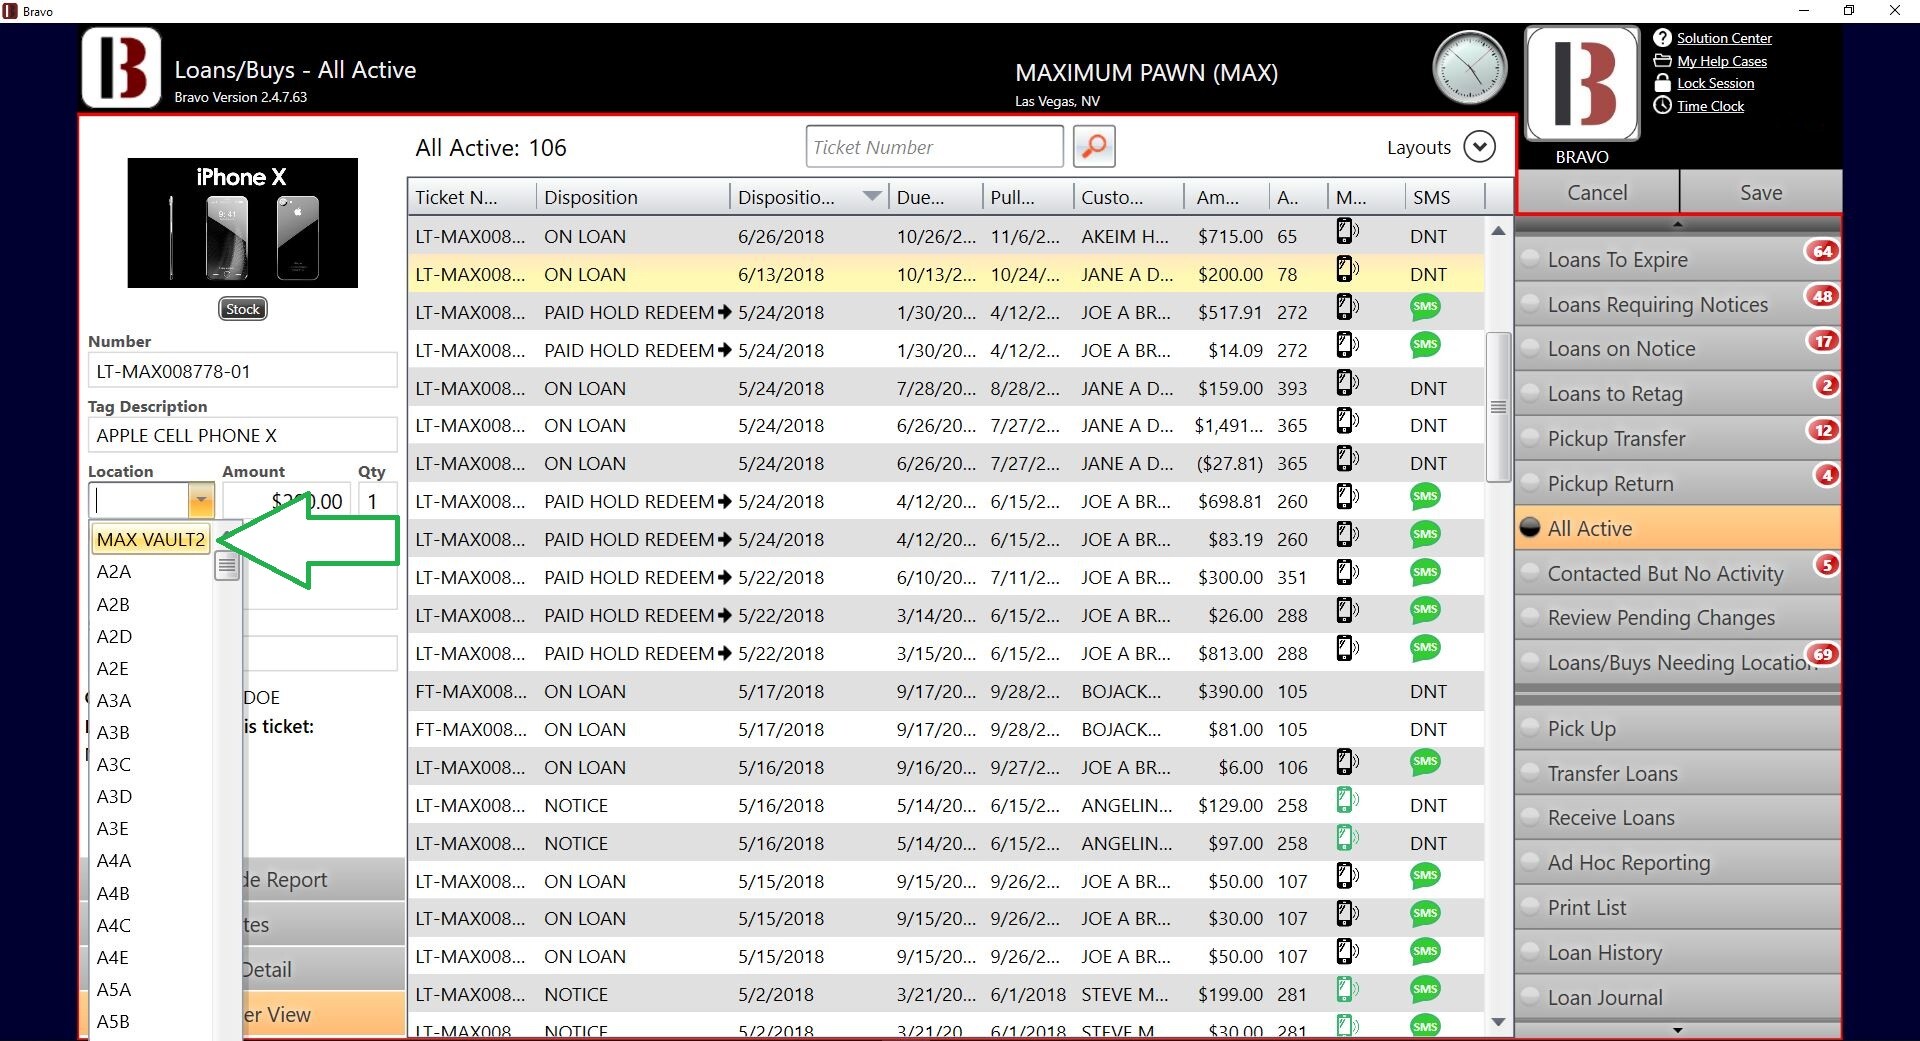
Secure Vault locations
An additional Location Type exists under the Storage Locations tab in System Configuration. Storage Locations with this Location Type can only be used for items designated to be sent to the secure vault. Secure Vault locations or vault locations will need to be setup in each store that has high security vaults. Similar to warehouse locations, you can set them up to suit your needs. At minimum, there will be a need of one per vault.
To set up Secure Vault locations, you will navigate from the dashboard to System Configuration > Storage Locations. Click on the drop-down selector under Location Types, click Secure Vault, then click Add.
Pick Up request for loans in Secure Vault locations
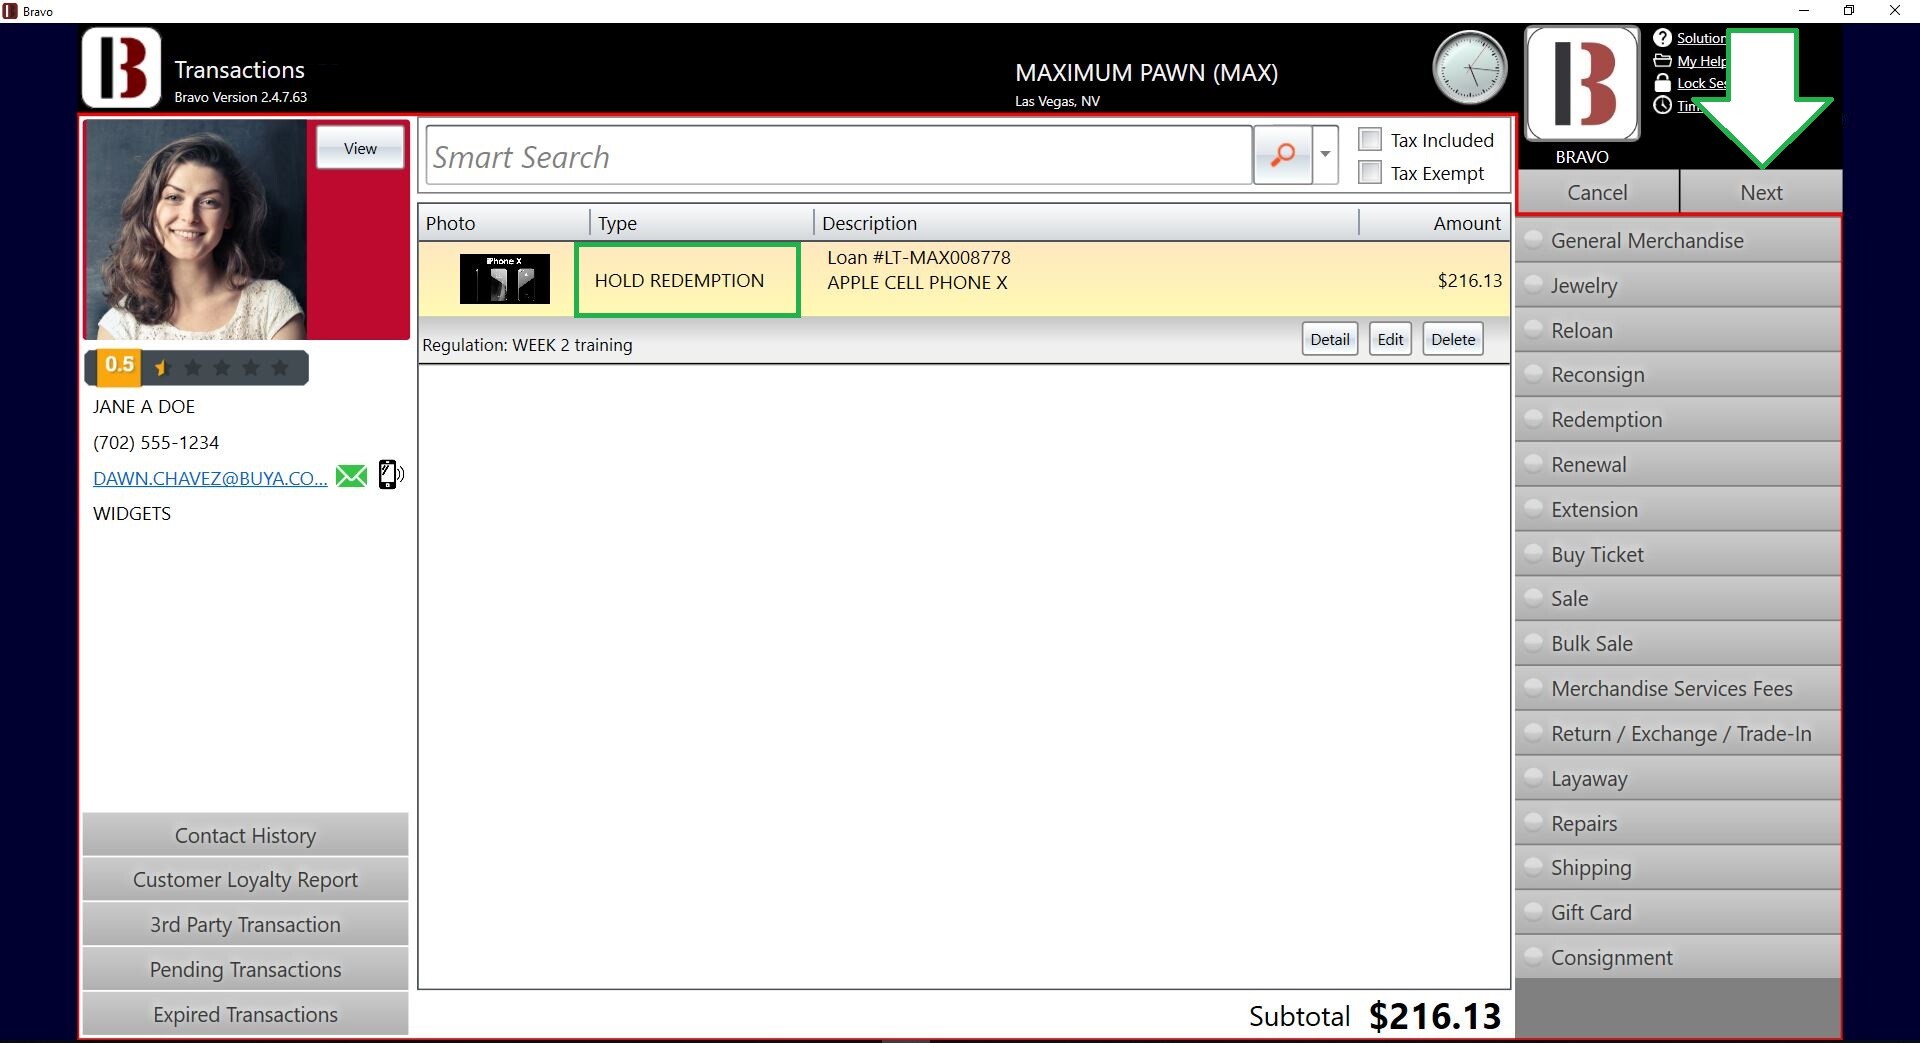
Loan items stored in Secure Vault locations must be transferred to warehouse locations before being redeemed. To initiate this transfer, a customer must request a Pick Up. A Pick Up can be requested in the following screens:
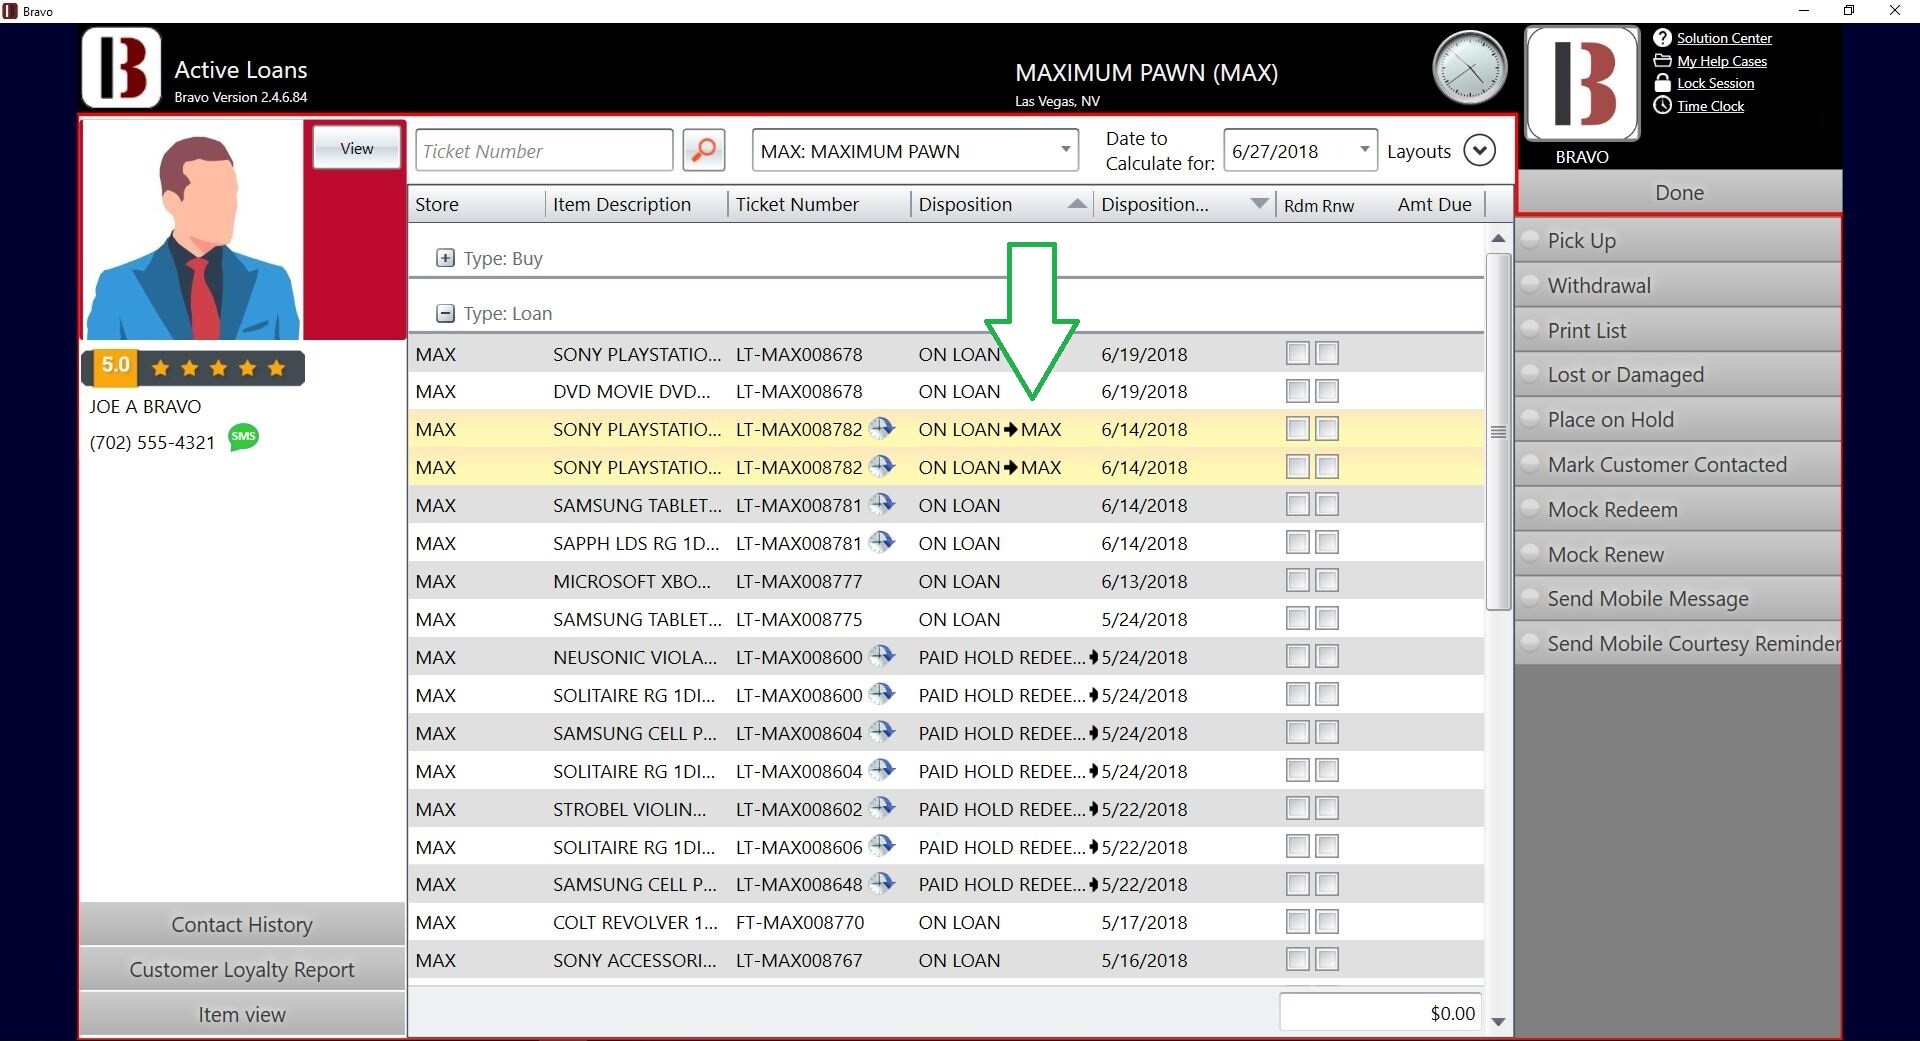
- Active Loans screen - On the Active Loans screen, select one or more loans and select “Pick Up” on the right panel. “Pick Up” can also be selected by right-clicking one of the selected loans.
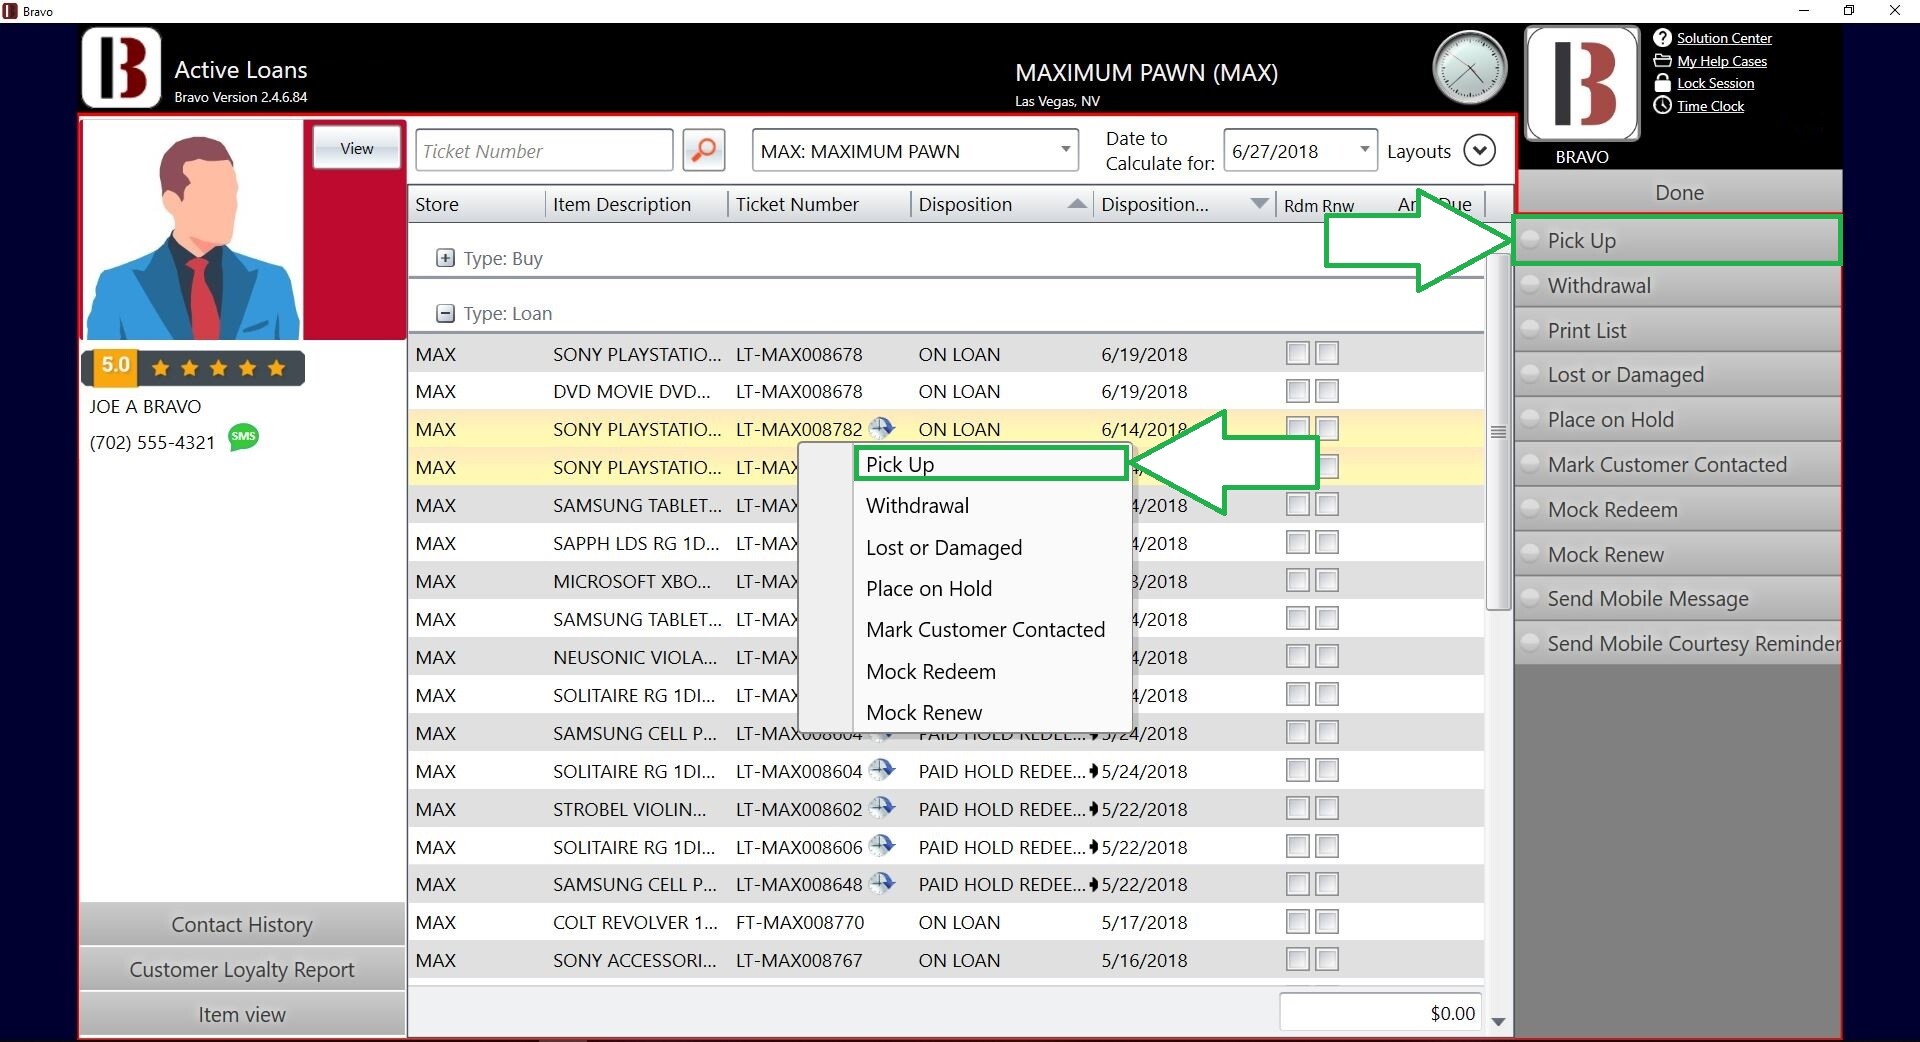
- The Disposition of the loan will change to display the store code of the destination store – the store to which the loan will be sent.
Redeeming Loans - no Pick-Up Request
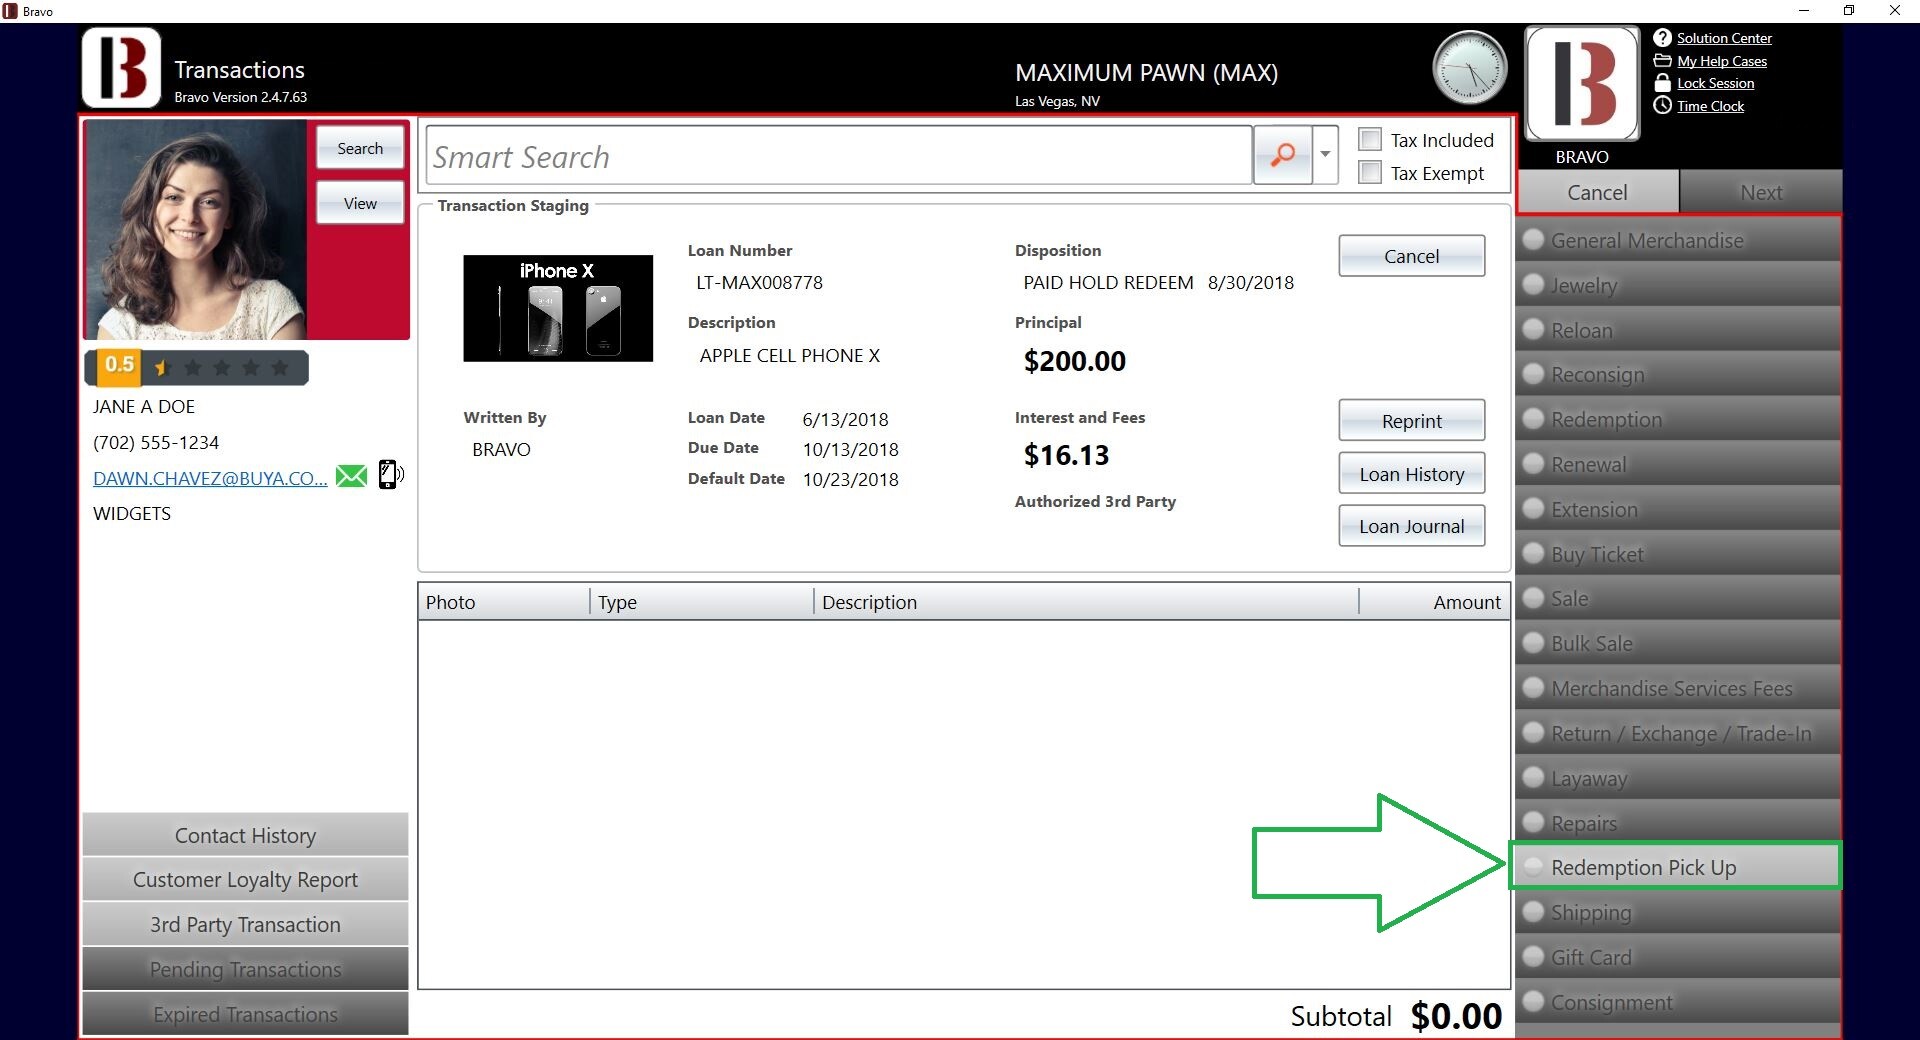
When a customer comes in to redeem their loan, the item will go into Paid Hold Redeem until it is transferred back to the originating store and picked up.
The loan is pulled up and it will immediately show SECURE VAULT on the first screen.
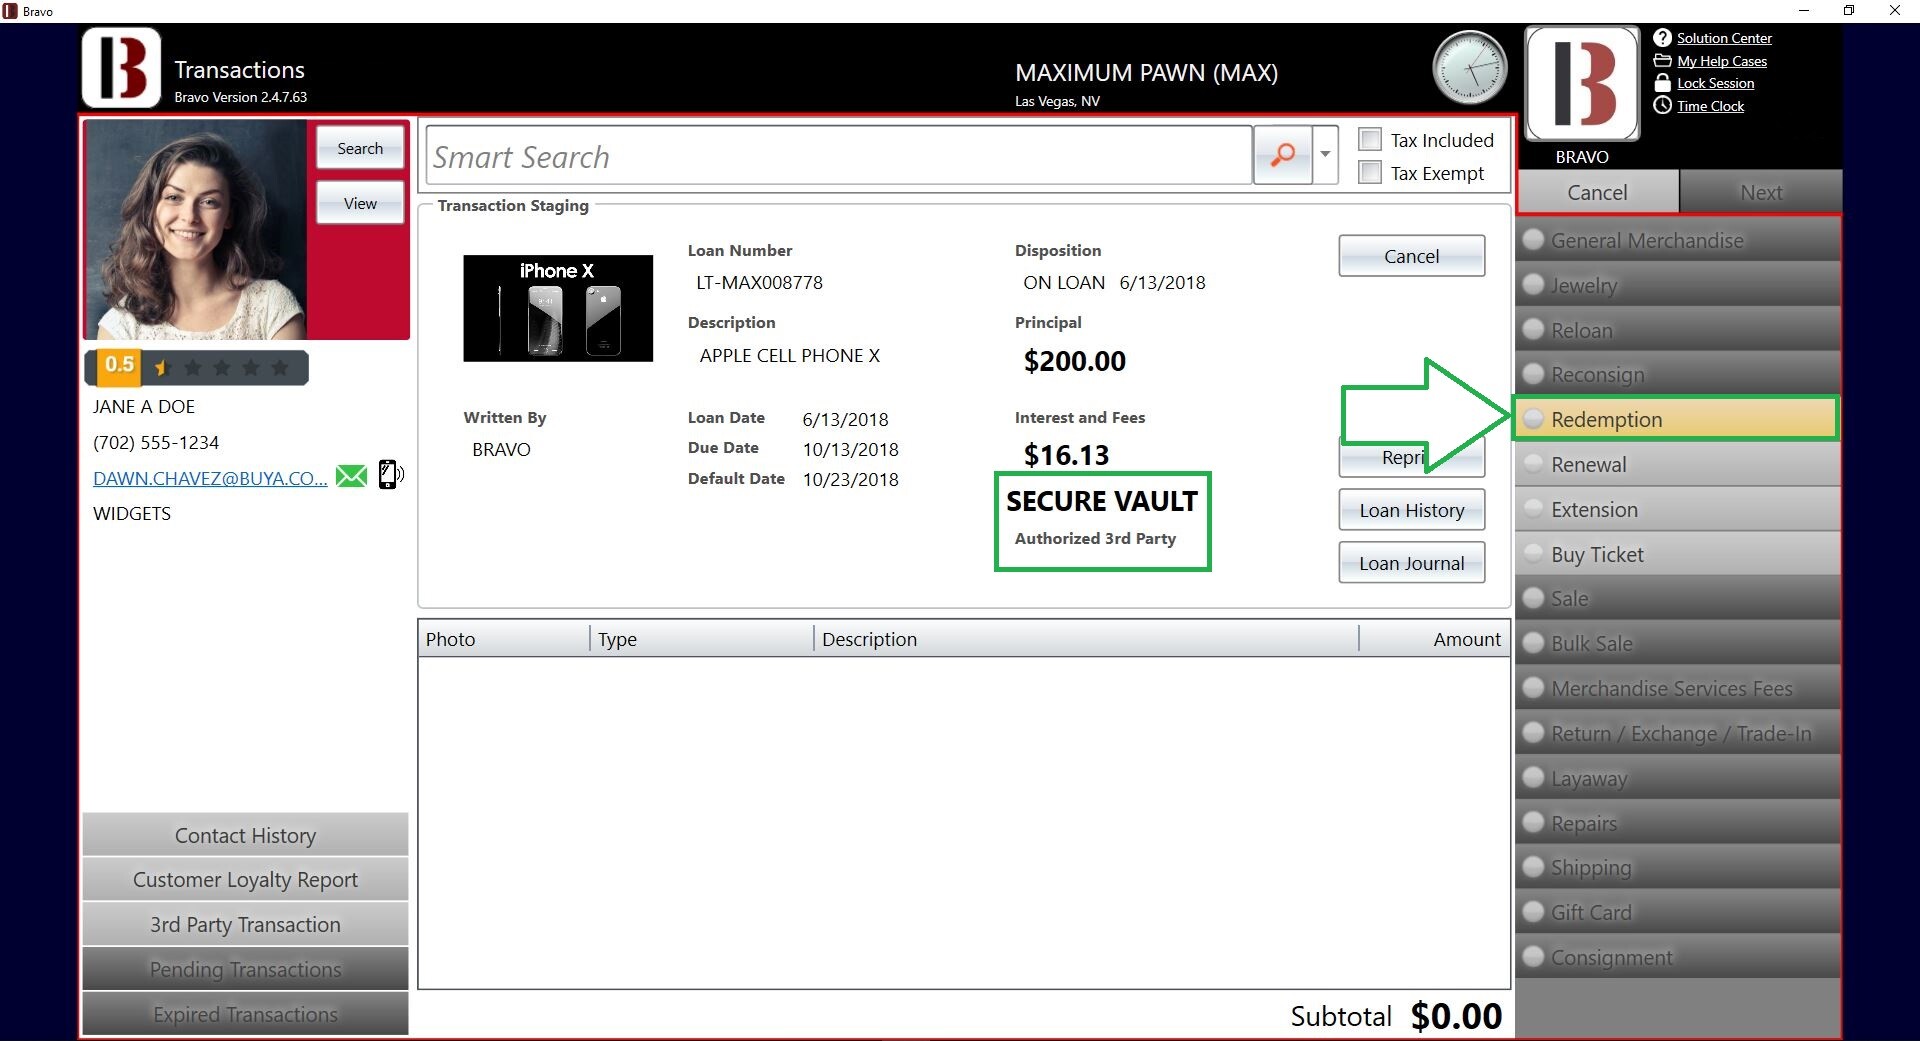
The customer can pay for the redemption, but will have to wait until the loan is retrieved from the vault location.
The loan will then need to be transferred by the Vault Manager at the Central Vault location back to the originating store.
The Destination Store will be selected automatically based on the Loan's originating store.
Loan will be received back into the originating store and given a general warehouse location.
Once the loan is received back in the originating store, the loan can be redeemed to the customer.
Vault management, incoming transactions:
New loan/buy items moving to the local secure vault.
After writing a loan, an employee should initially locate loan items to warehouse locations. Then, a vault manager should relocate the loan items to Secure Vault locations.
New loan/buy items moving to a vault in another store:
After writing a loan, employees can initially locate loan items to local warehouse locations within the store.
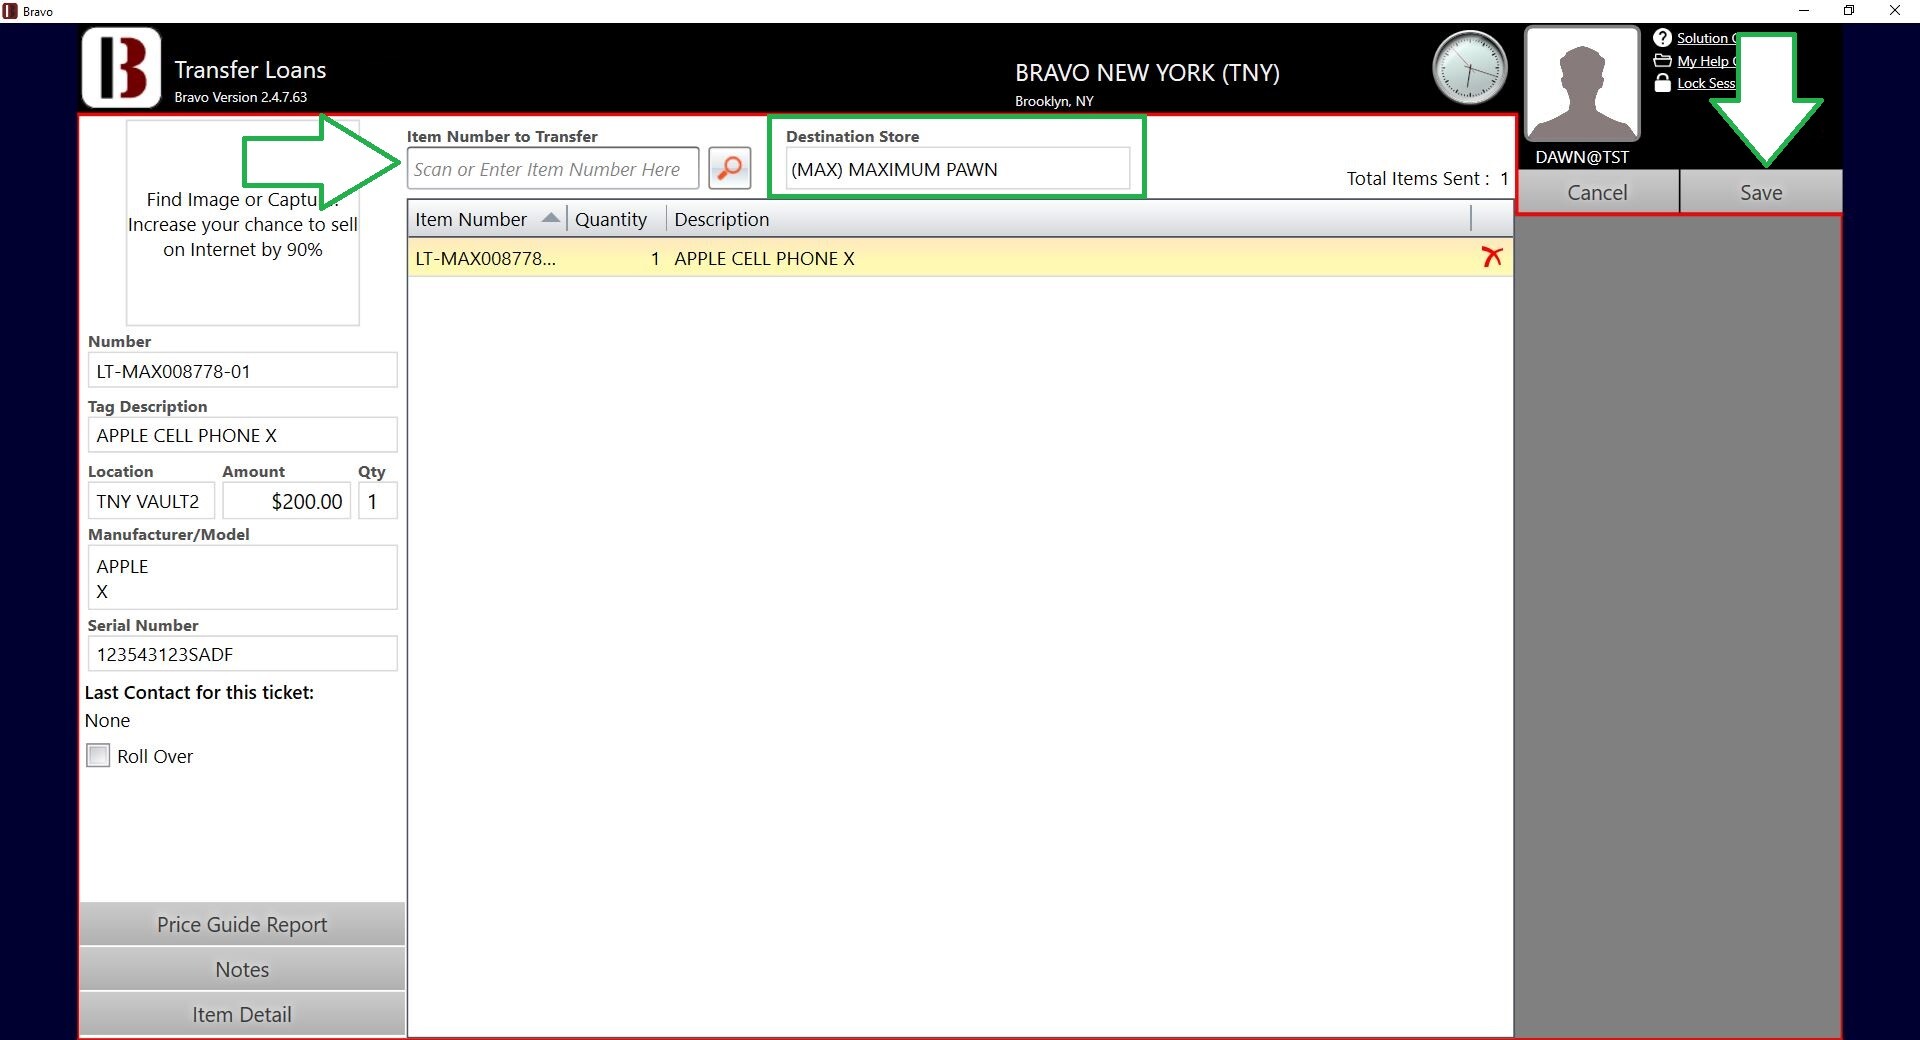
The loan will then need to be transferred to another store by an employee with appropriate security permissions. They will create a loan transfer batch by clicking on Transfer Loans in the Loans/Buys screen.
Enter the loan item numbers in the Item Numbers to Transfer screen.
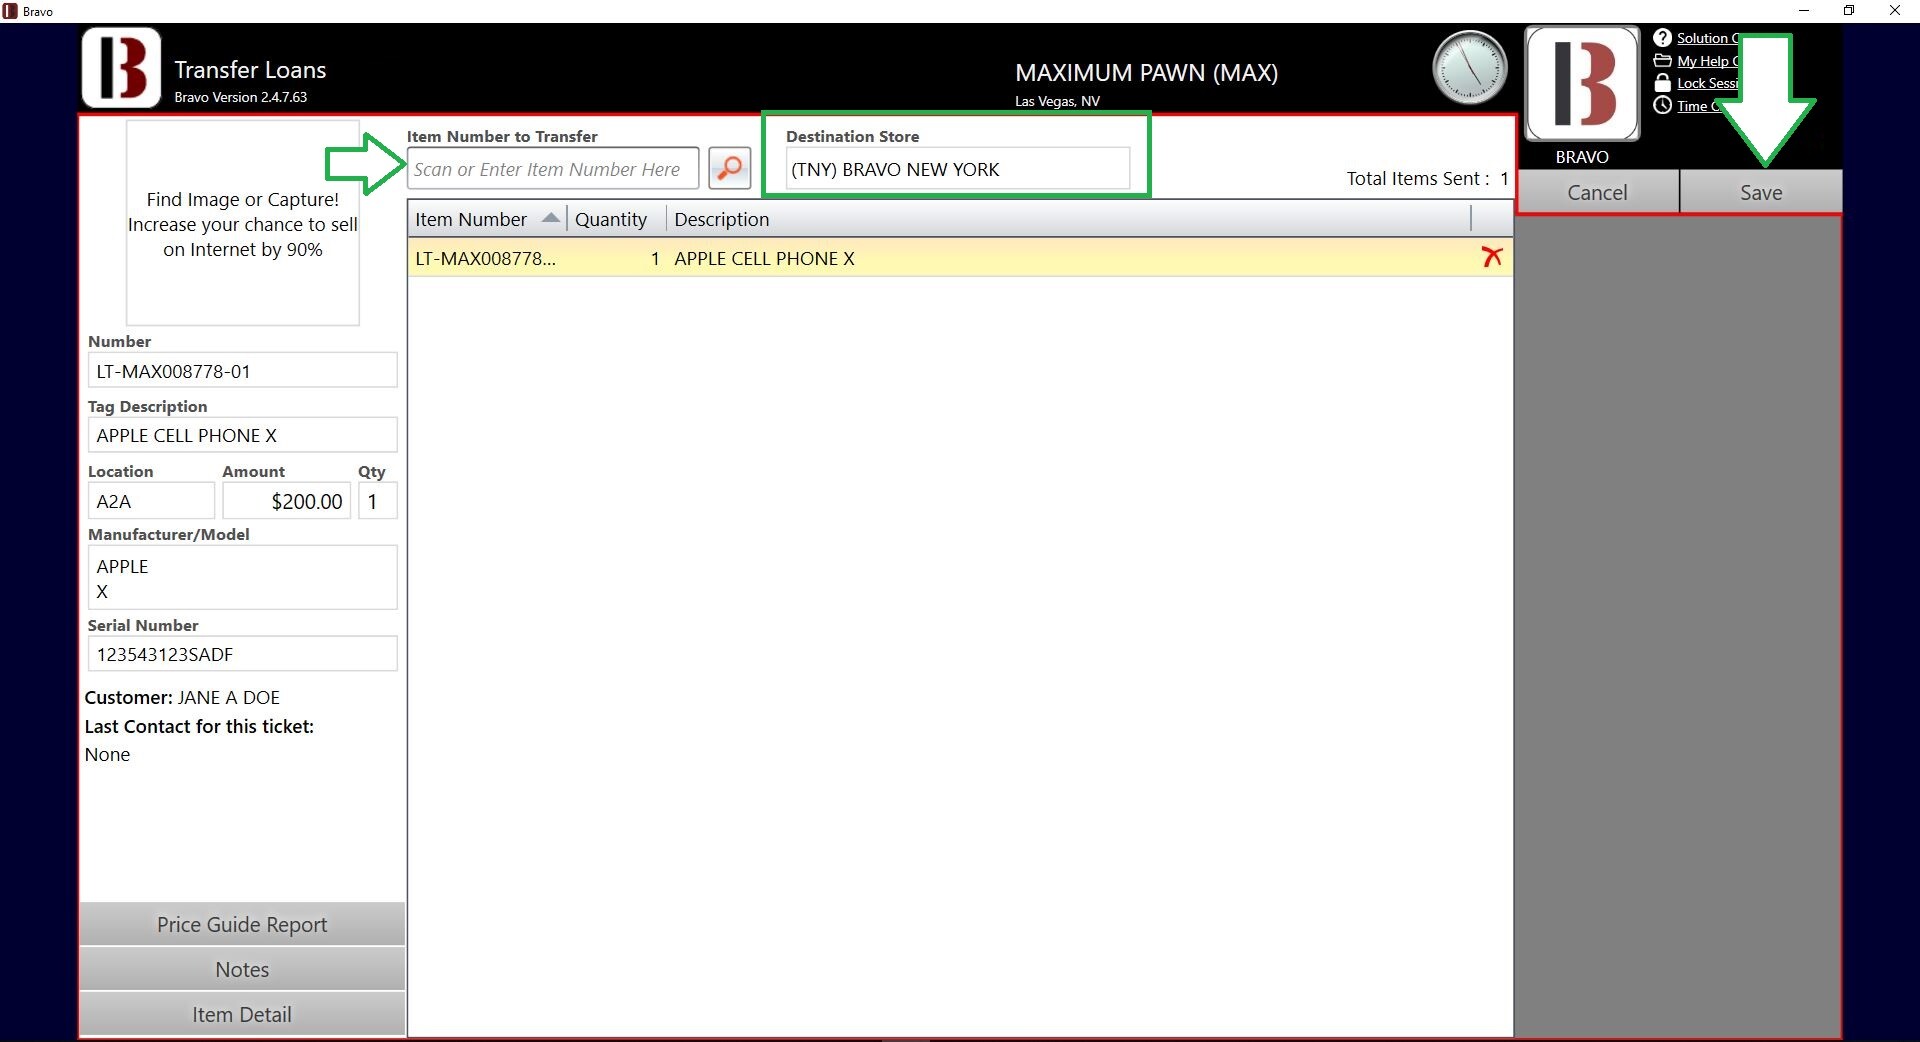
The Destination Store of the loan transfer will be set to the configured Store of central vault by default. This destination store cannot be changed from the Transfer Loans screen – the store must contact a Bravo support agent to have this destination store changed.
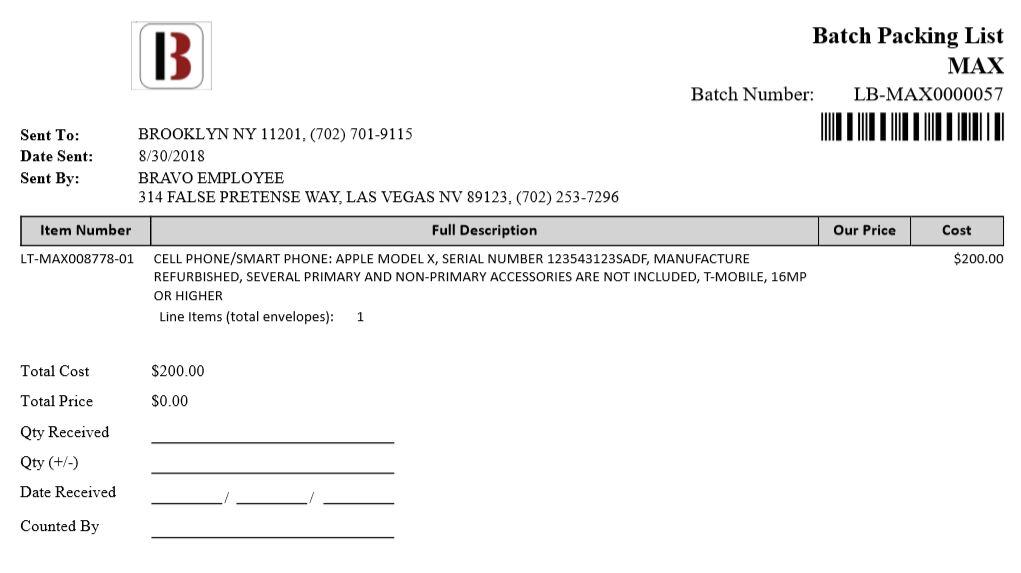
Once saved, the Batch Packing List will print for the loan items being transferred.
Central vault receiving store
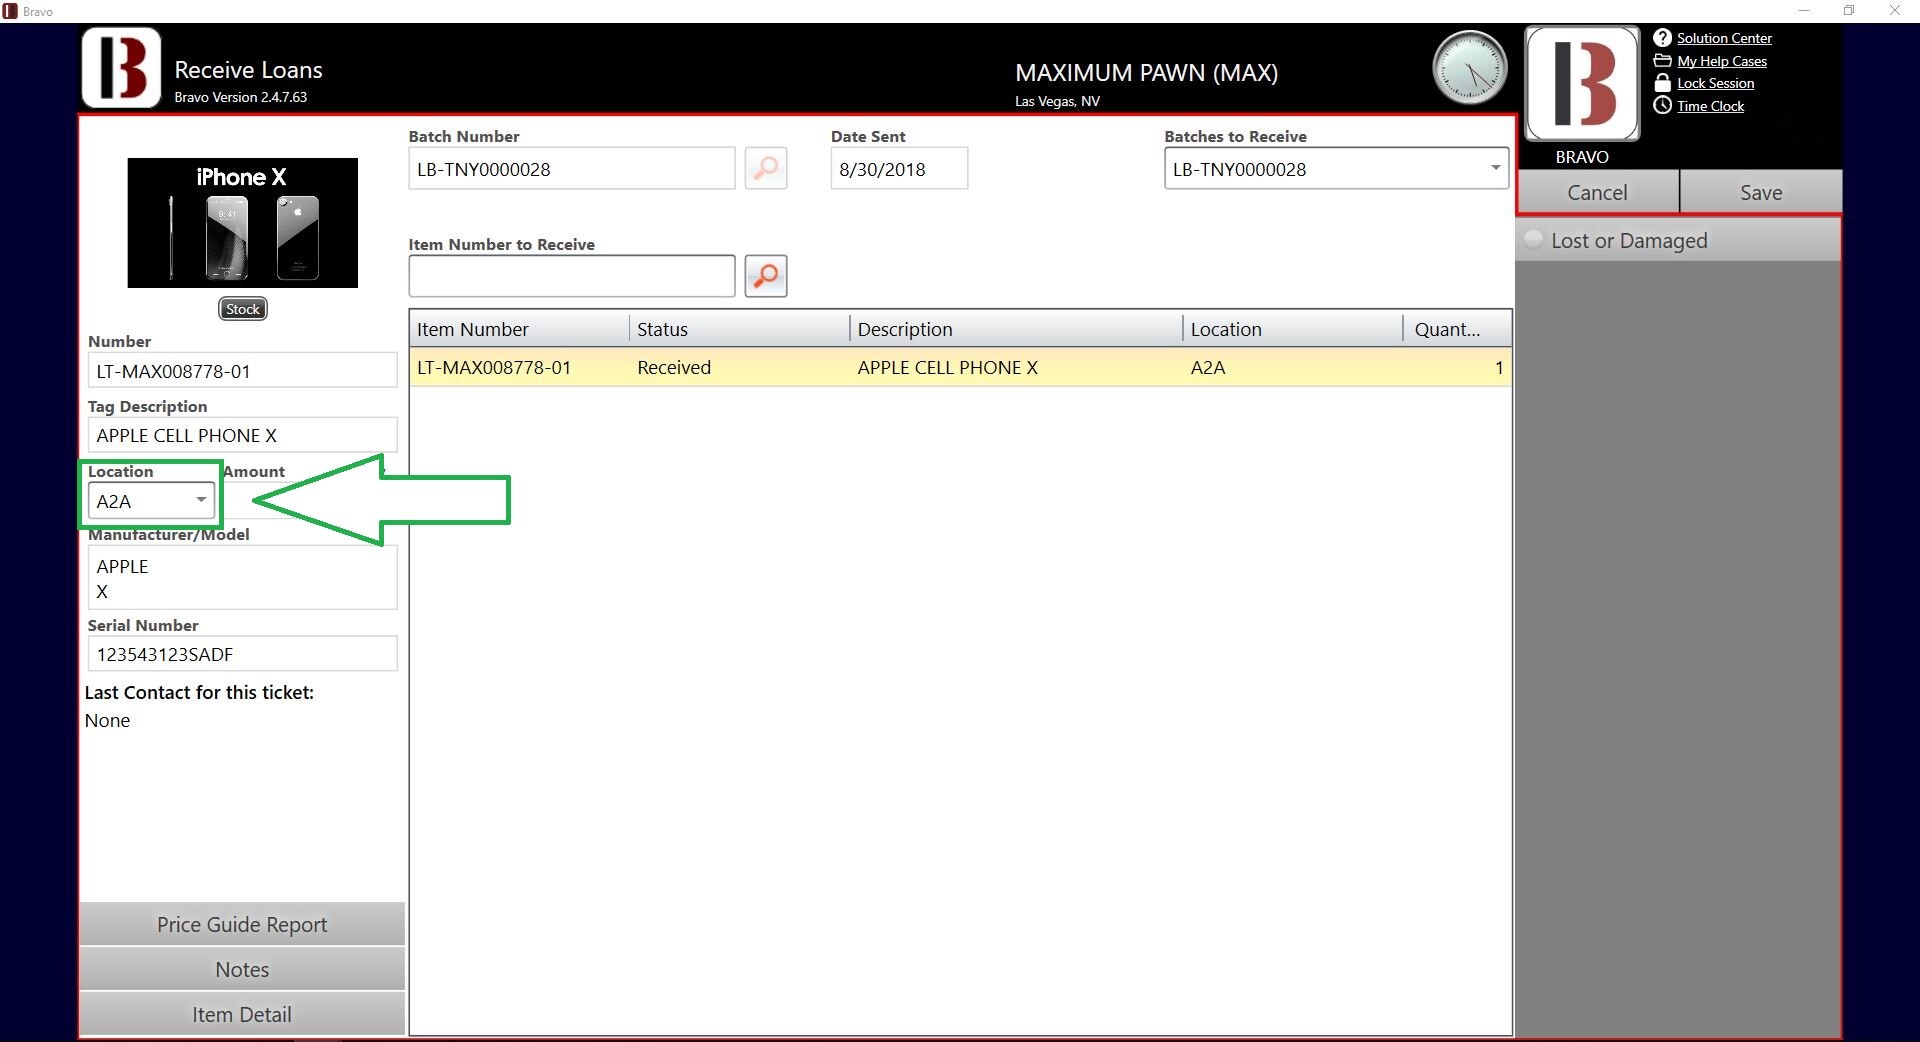
At the receiving store, employees verify receipt of the transferred loan items by clicking on Receive Loans in the Loans/Buys screen.

Enter the Batch Number on the Receive Loans screen. Then scan or enter the item numbers in the Item Number to Receive field. Set the location of the items as you receive them.
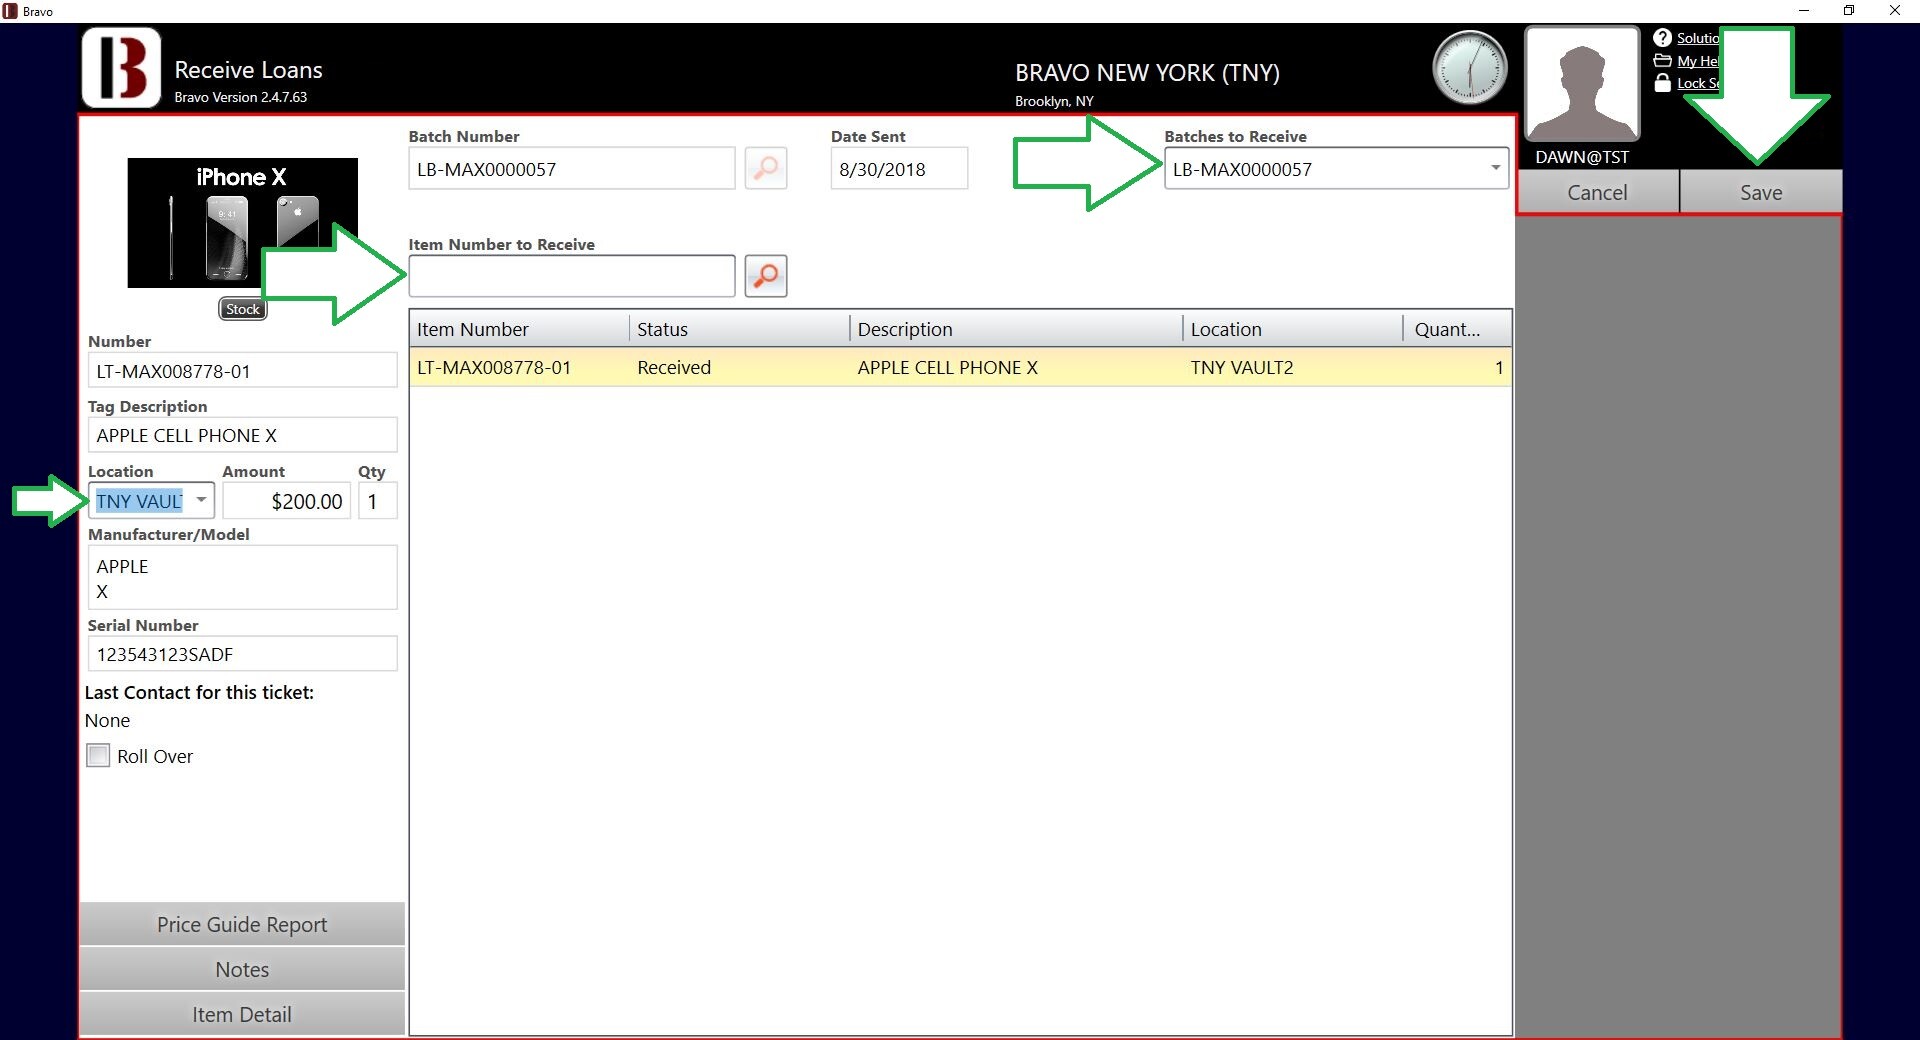
Once a location is set, all subsequent items will have that same location, until a new location is selected. Once all items have been received and located. Click Save to complete the receiving process.
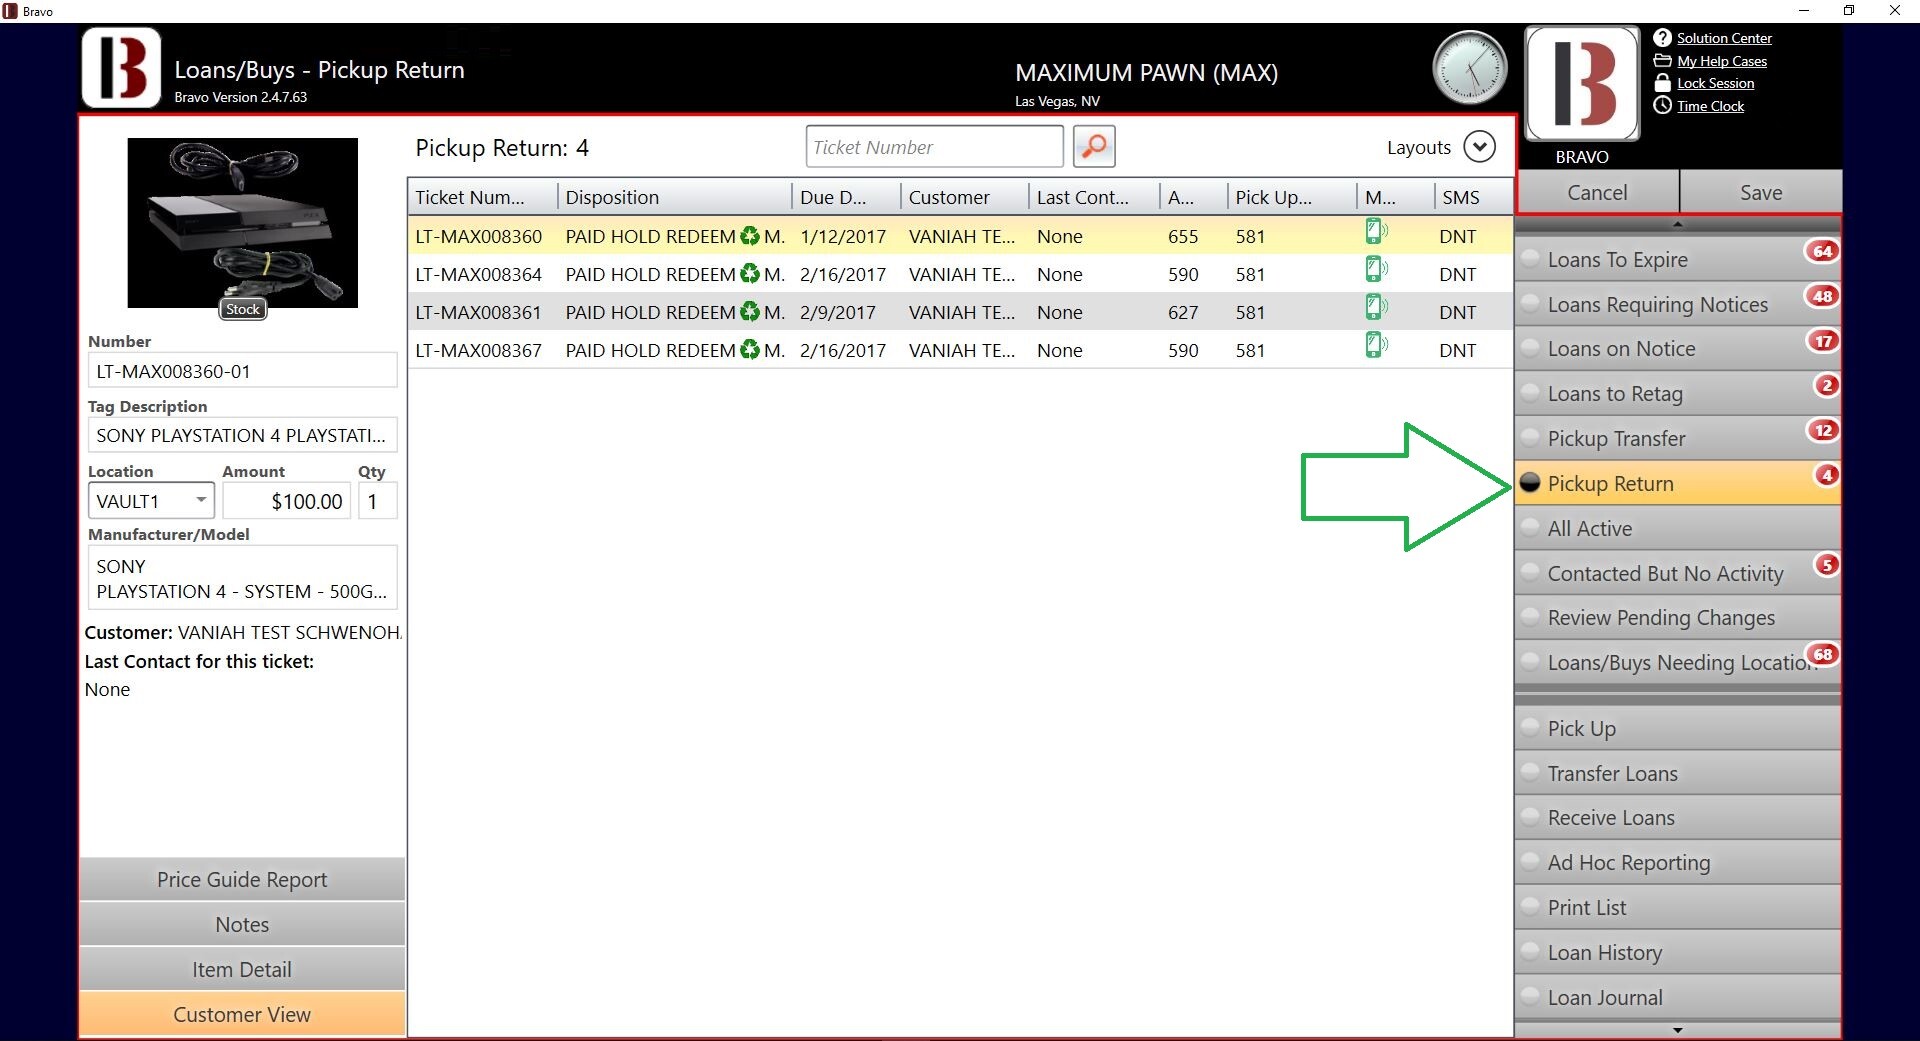
Expired Pick Up Request - Local Vault:
If a loan item has been relocated from a local Secure Vault location to a warehouse location as part of a Pick Up request fulfillment, the loan items will remain in the warehouse location for the configured number of Pick Up Hold Days. If the loan is not redeemed within this configured number of days, the loan items will appear in the Pickup Return screen, and should be transferred back to a local Secure Vault location.
Expired Pick Up Request - Vault in Another Store
If a loan item has been sent back from a Central Vault store to a local warehouse location as part of a Pick Up request fulfillment, the loan items will remain in the local warehouse location for the configured number of Pick Up Hold Days. If the loan is not redeemed within this configured number of days, the loan items will appear in the Pickup Return screen, and should be transferred back to the store with a Secure Vault location via the same process used to send new loans to the central vault
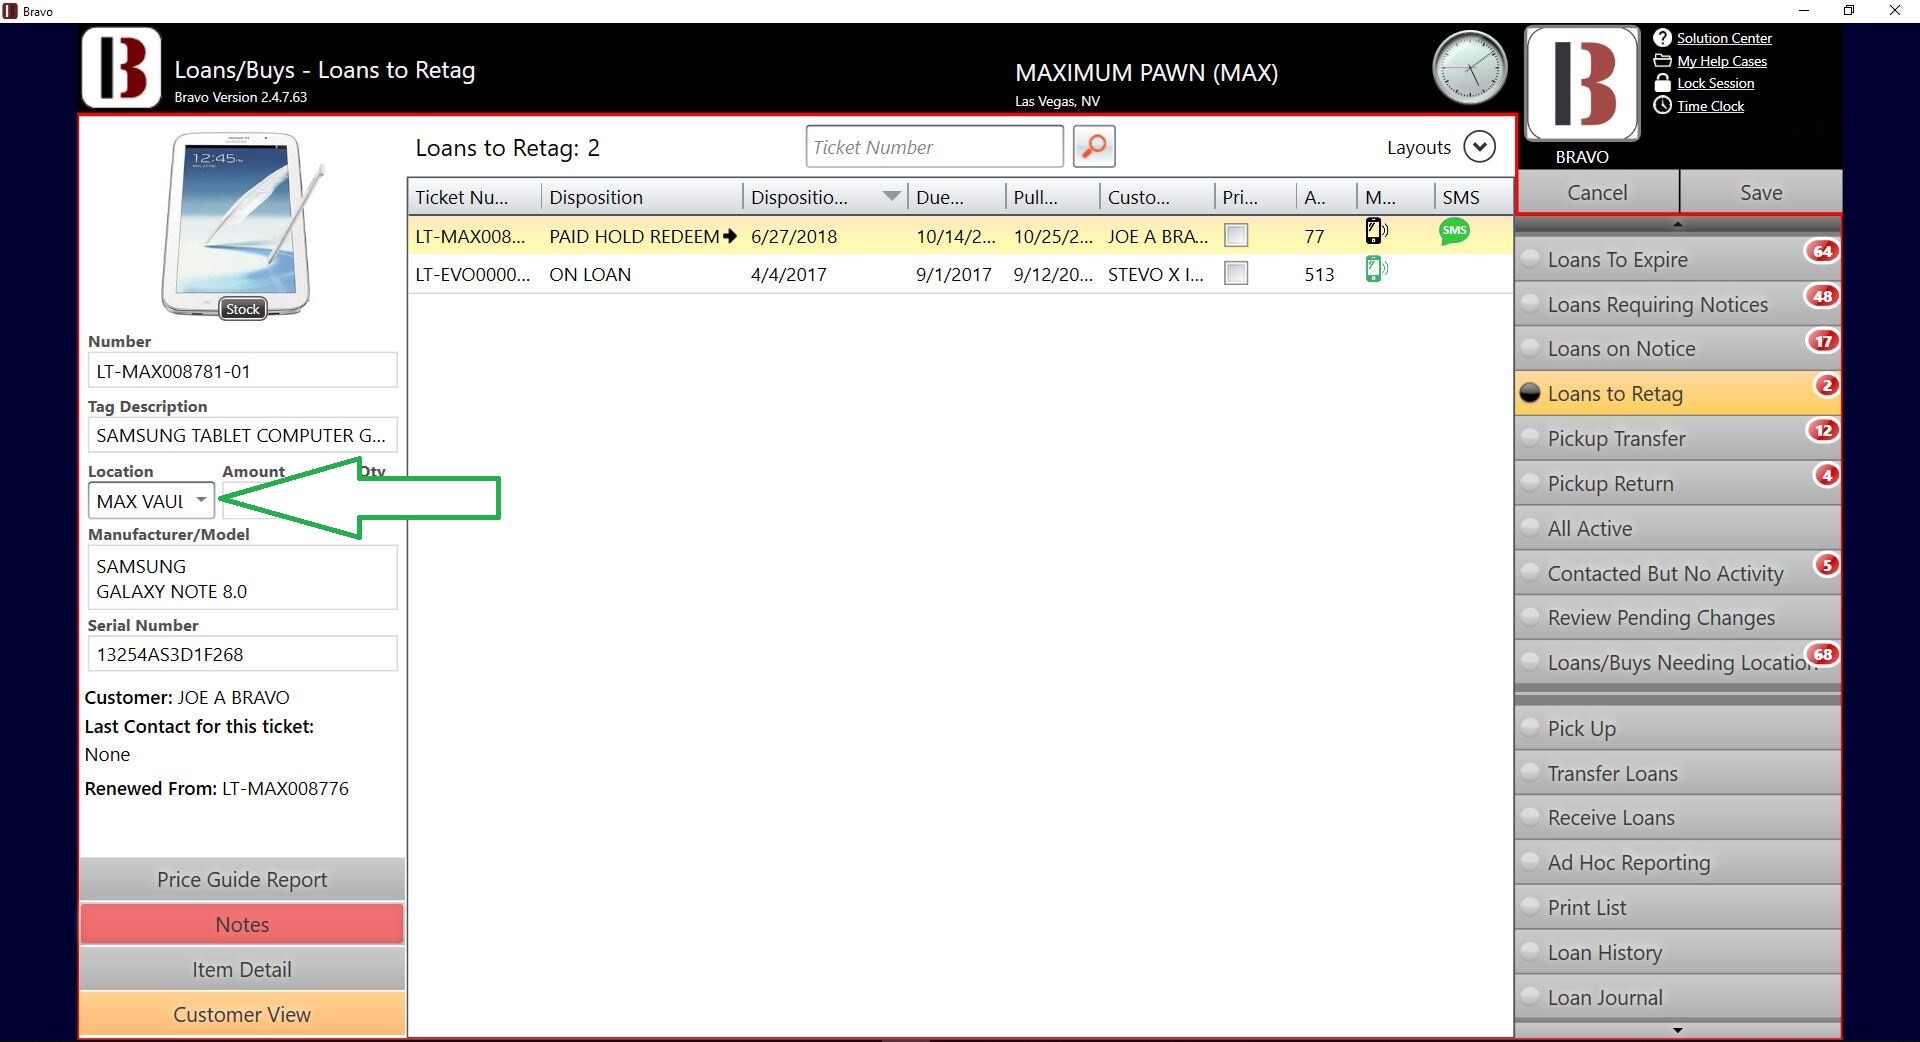
Loans to Retag
Only employees with access to Secure Vault locations will be able to see the loan items in the vault which need to be retagged.
Vault Management Redemption of Loans
- With Hold Redeem of a loan in Secure Vault set to: “When in another store only”
Loans located locally in a secure vault may be redeemed without hold. Upon redemption, a redemption receipt will print out to the Vault Redemption Receipt Printer (if configured), allowing an employee to retrieve the item(s) listed on the receipt and bring them to the redemption counter to be returned to the customer.
- With Hold Redeem of a loan in Secure Vault set to: “Always”
Transaction staging will alert the clerk that the item is in a SECURE VAULT. A Pick Up request must be made before redemption can be fulfilled. After collecting payment for the redemption, these loans will be placed on Hold Redemption, allowing for the store to transfer the loan item(s) back to a warehouse location.
A Pick Up request is automatically generated upon completion of the Hold Redemption transaction. Performing a Hold Redemption will print a receipt for the customer to return with to finally pick up the item. Once placed in a warehouse location, the customer can come back to pick up the items.
Alternatively, the customer can go directly to the store currently in possession of the loan items, where an associate can process the hold redemption directly without the need to transfer to the originating store.
Date Created: 11/17/2016
Date Updated: 1/17/2025