
Last Updated: 2/25/2025
If the message you are sending is not a notice or reminder with pre-filled text, you will need to manually enter in the store's name in the message so that your customer knows who the message came from.
If you are registered for MobilePawn, messages from Mobile Messages/Events will prioritize MobilePawn first, followed by SMS. This order is based on the lowest message charges.
Configure the SMS Workstation and Employee Security
An Employee can be given access to sent Text Messages and to do this follow these steps:
- From the Dashboard, select System Configuration from the side menu.
- Select the employee and the Security Tab on the right.
- Click the Edit button and set SMS Text Message Integration to Allowed.

Note: The ability for scheduling an Mobile Event for all customers requires separate permissions. Please contact Bravo Support for help with this.
Enabling the Chat Box Icon
- When creating a customers profile you will need to ask the customer if they would like to "Opt in" to text messages in order to receive messages. If so, you can leave the DNT box unchecked.
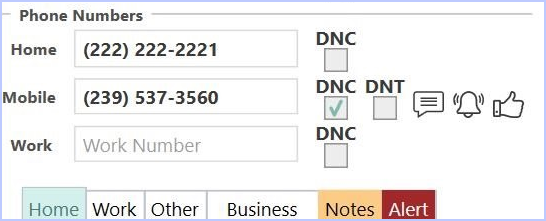
- The Do Not Text (DNT) checkbox is unchecked by default. If the customer does not wish to receive messages or MobilePawn notifications, check this box.
To enable a customer to receive SMS messages:
- In the Edit Customer screen, enter the customer’s mobile number and uncheck the “DNT” box.
- A Chat Box icon will appear to the right of DNT.
- The Chat Box icon indicates that the customer is enabled to receive SMS messages.
- If the Chat Box icon does not appear, then please contact Support to have the SMS enabled.
Sending your First SMS Text Message
NOTE: Due to SMS limitations, text messages should be limited to 160 characters. If the message exceeds 160 characters, an additional text to the customer will be generated. This can result in multiple charges for one message. SMS can be set to require that messages are sent with only 160 max characters per message.
To limit SMS messages to just 160 characters max, this is set in the ALLOW LONG MESSAGE BODY.
- From the Dashboard, select System Configuration from the side menu.
- Select the Configuration Tab and scroll down to TEXT MESSAGE CONFIG
- Check the type of message you want to exceed the 160 char max in Allow Long Message Body
To sent an SMS message
- In the customer's profile, click the Chat Box icon and a dialog will open to send a single SMS message.
- Enter the message to send and click the Send button:

- SMS messages will be sent immediately during normal stores hours, between 9:00am - 9:00pm using the store's time zone.
Contact History
A log of every SMS message sent is kept in the customer’s Contact History. To see the customer’s contact history;
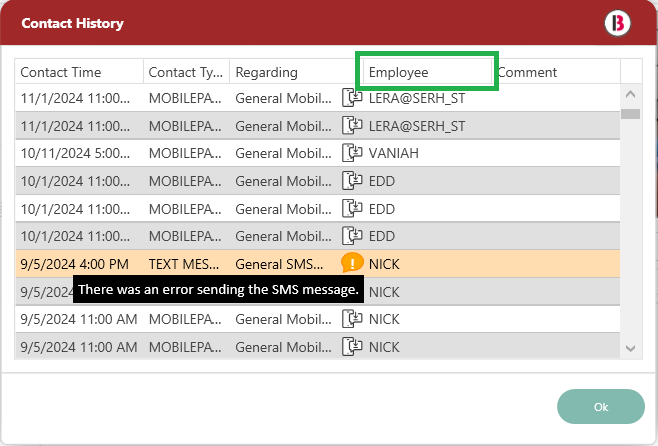
- Click the Contact History button on the left vertical customer view, which will open the dialog (see below). A new column, "Employee" is now available in Contact History for greater visibility on which employees are contacting customers. This list can be filtered by any of the columns present.
- If the SMS was sent successfully, the Chat Box icon will appear.
- If it is queued to be sent, a green and black icon with a timer will appear.
- If there is an error, a red balloon icon with an exclamation point will appear.
- Click the icon to see the current status and associated message.
In the example below, there was an error sending an SMS message.
Send Loan Notices Using SMS
SMS messaging can be used instead of regular printed notices or to supplement them.
Note: If using instead of printed mailings, please make sure to verify your local and state regulations which may require notices to be printed and sent using regular or certified mail).
1234
To send SMS Loans notices for all customers that have been opted-in, the process is as follows:
- From the Dashboard, select Loans/Buys on the right.
- Select Send Loan Notice from side menu.
- Next, select, Send Mobile Notices for all from the side menu.
- This will automatically find all the customers that have opted in and queue up the Mobile notices.
- An Information window appears stating, "Mobile Notices have been queued and will be sent when Saved".

- The loan disposition will be changed to NOTICE and the message(s) are sent when Save is clicked.

- The SMS message text for a Loan Notices cannot be edited from this screen. Edits can only happen in the SMS Messaging template in System Configuration.
- Multiple loans for the same customer are grouped together into one message:

- When a single loan is notified, the message includes the loan number and the total redemption amount. For multiple grouped loans, the message reflects the total for all loans.
- To create a single SMS notice for the selected customer(s) only, use the Send Mobile Notice button.
- To send supplemental notices in addition to regular notices, put the loans on notices as you usually would and save and print them.
- Then got back into the Loan Management screen and select Loans on Notice and sort the loans by disposition date so the most recent are on top.
- To send the SMS notices, multi-select the loans that were just put on notice using the shift-key
- and then click the Send Mobile Notice button. This will queue up the SMS notices to be sent for the selected customers that have opted in to receive SMS messages.
Send Layaway SMS Notices
- Sending layaway SMS is the same as printed Layaway Notices.
- Select the customer(s) to send the message to and click the Create SMS Notice button.
- Like loan notices, multiple layaways for the same selected customers are grouped together so only one notice is sent.

Send Custom Notices or Messages
- The Send Mobile Message button on Layaway Management, Loan Management, and Customer Management can be used to schedule and send custom messages to the selected customers in the grid.
- If you would like a different generic message to be sent to the selected customers, instead of the standard notice text, use this option. The message can be sent immediately or queued to be sent on a later date.
Automatic Mobile Messages
- Use the Schedule Mobile Event button on the Customer Management screen to send messages to ALL the customers that have opted in to receive SMS.
- The checkbox is used to enable (activate) the events in the list. The enabled events in the list will be scheduled to send an SMS message to all customers that have a valid mobile number and do not have DNT turned on.
IMPORTANT: Scheduling a mobile event will notify ALL customers across all stores who have opted in.For enterprise, multi-store customers, it's recommended to send automatic messages from ONE STORE ONLY to prevent multiple notifications to your customers.
There are five predefined events:
- The Birthday event will automatically send an mobile message to all customers on their birthday. The default text can be changed as you would like.
- The Store Anniversary event will automatically send an mobile message to all customers annually on the one year anniversary date of their first transaction time in the store (pawn, buy, or sale).
- The Loan Courtesy Reminder event will send a reminder (NOT an official notice) when a loan is nearing their due date. You can set this reminder to send up to 30 days before the Due Date of the loan.
- The Layaway Notice event will send a reminder when a layaway is nearing its due date. You can set this reminder to send up to 30 days before the Due Date (aka Term end date) of the layaway.
- The Loan Past Due event sends a reminder when a customer's loan is overdue. It's useful if there's a grace period for item redemption after the due date. This reminder can be scheduled up to 30 days past the due date.
To create other events ...
- Click the green “+” button at the top of the dialog.
- Make sure the event type is CUSTOM. Enter the future date and time to send the SMS message.
For Example: this could be used to schedule and send a Valentine’s Day offer on February 13th, or for a upcoming 4th of July sale. In this case, the date and time to send would most likely be a few days before the holiday.
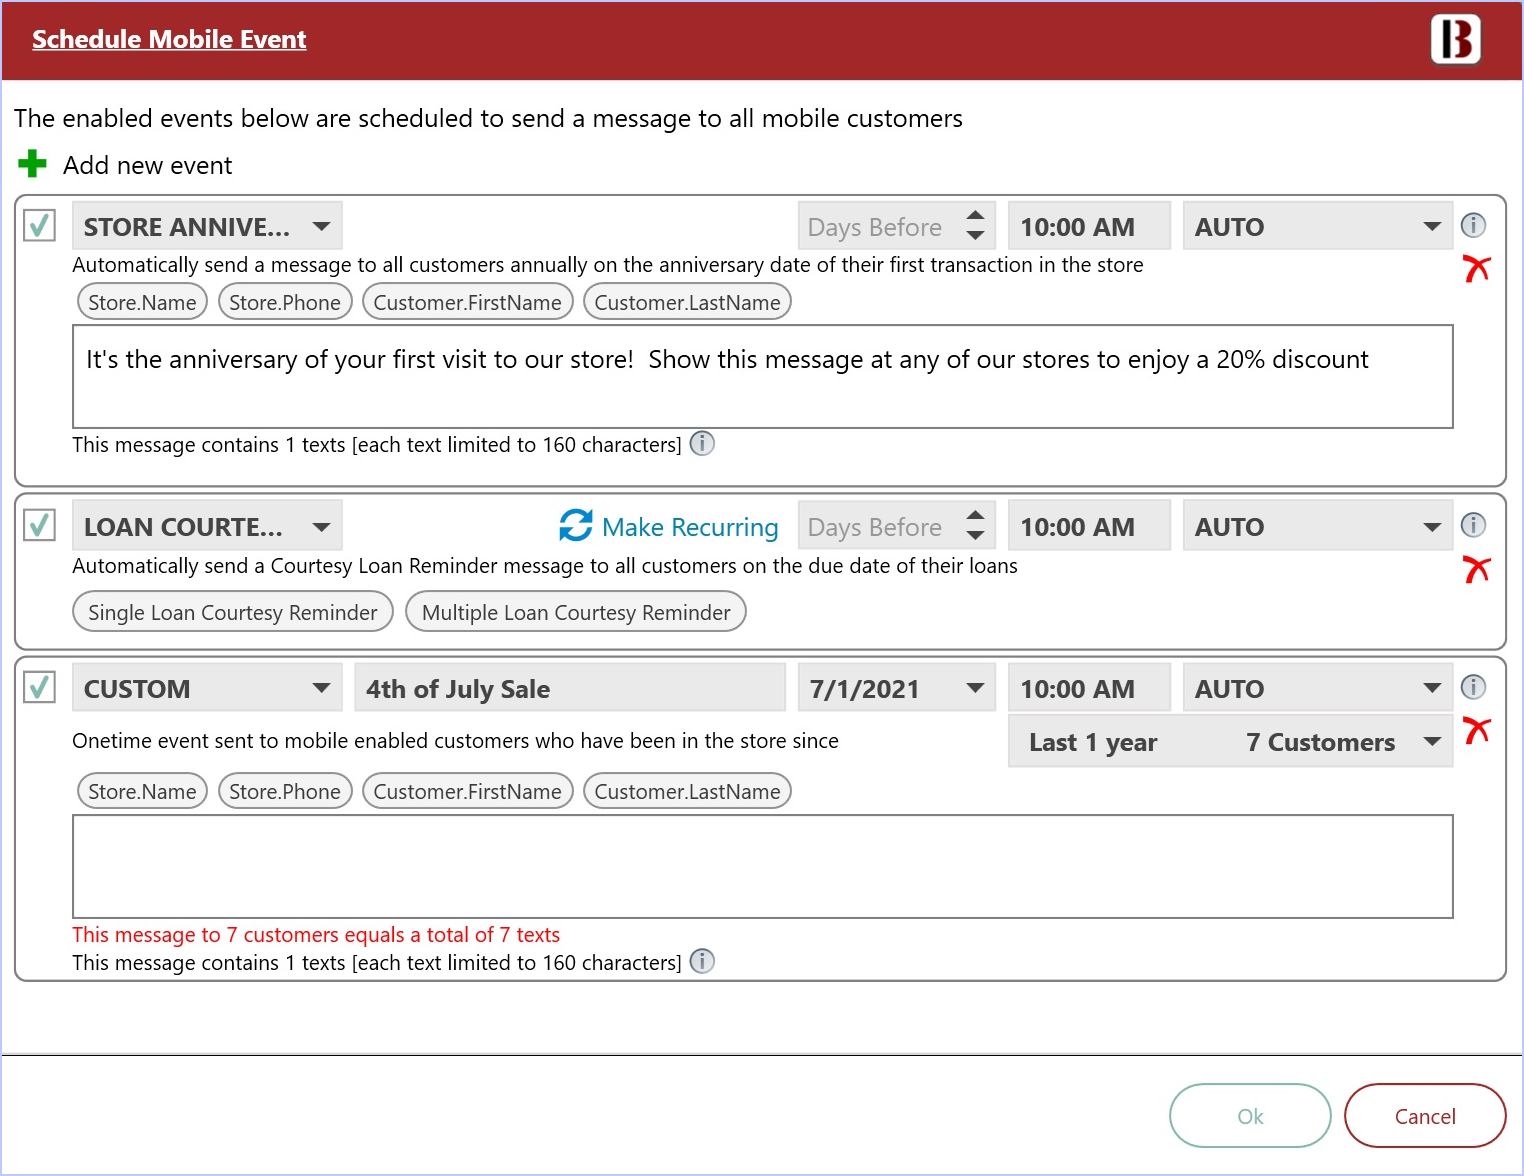
- You can select the number of customers to receive messages from a specific time period or send it to all customers who have ever visited the store. (UNLIMITED)
 To learn about making an event recurring, click here
Customer SMS Template
Bravo now supports custom SMS templates for Loan and Layaway notices. The default templates are the same as the former static text. If you would like to change the standard template, the templates can be edited on the store Configuration tab in the System Configuration. There is a new section that contains all the templates in TEXT MESSAGING CONFIG

- To customize a template, click the Edit button on the top of the screen
- Click the pencil icon on the right side of the corresponding template. The text in the teal color will be replaced automatically with the correct values.
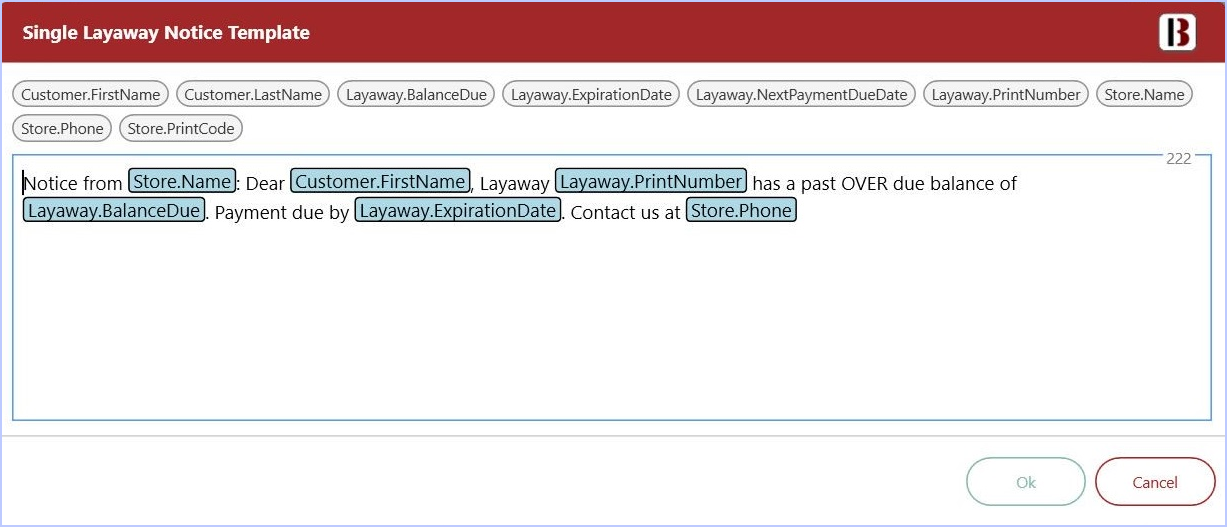
Below is the default template for a single Layaway Notice.
- The regular text can be edited to whatever is desired.
- When the layaway notice is generated from the Layaway Management screen, the custom template will be used.
Note: Due to SMS limitations, the text should fit in 160 characters after the values are substituted. Otherwise the customer will get two (or more) messages and you will be billed for each message sent.
Customer Opt Outs
- A customer may opt out of SMS messaging at anytime by replying 'STOP' to an SMS message received.
- This will set the DNT checkbox for that customer.
- Once a customer has opted out, they will receive no further SMS messages until opted back in.
- They can only be opted in by unchecking the DNT in Bravo for that mobile number.