
The Bravo Shopkeeper App gives stores and managers greater flexibility and ease when it comes to backroom and administrative tasks. It allows stores to:
-
Scan a barcode of an item in Bravo to be able to update old images and sync it to the system.
-
Capture photos using a phone’s camera and upload them to the item in Bravo within minutes.
-
Employee must have the ability to Edit Items.
-
-
Send approval/denial notifications to a Manager’s phone, so transactions can get approved or denied immediately.
-
If a profile has access to multiple stores, all approvals and notifications will be seen from all the stores accessible.
-
-
Relocate multiple items to the same location (See Bravo Mobile - Bulk Item Relocation)
This article will cover how to set up the app and get started using Bravo Mobile.
System Requirements
Bravo Shopkeeper works with Apple and Android mobile devices.
Bravo Shopkeeper and MobilePawn app must be installed on a mobile device and NOT an Android Tablet or iPad
Using Bravo Mobile
When Bravo Mobile launches, a login screen appears. Use the same credentials as Bravo. If multiple users have the same alias in different stores, specify the store short name.
The username format should be: alias@storeshortname (e.g., john@tst), similar to how regional managers log into different stores.
After logging in, users access the Find Item screen. Click the blue Scan Item button to use the camera for scanning barcodes, or enter an item number in the search field.

When an item is found, the app shows its screen with the item number at the top. The primary picture is displayed below it. A dark gray bar appears if it's a stock image; otherwise, it won't. Users can scroll to view additional images. Below the pictures, item details include tag description, manufacturer, model, quality, MSRP, price, cost, location, and status.

If an item is in inventory, unpriced, on loan, or within its hold period, two buttons will appear: "Take a Photo" to use the camera, and "Load from Gallery" to select existing images from the device. Users can upload images to the app from either option.


Note: Only items in the specified statuses will display the Take a Photo or Load from Gallery buttons. Changes to primary pictures in the app sync with Bravo in real-time. Click the gallery link in the upper right corner to view all pictures for this item.

Clicking on an individual image from within the gallery will bring up that image with two options: Set as a Primary or Delete. If neither option is desired, click on either “Done” in the upper right hand corner or the arrow in the upper left hand corner.

Setting a picture as the primary one means that this will be the first picture to appear. Primary pictures appear with a star in the upper right hand corner.
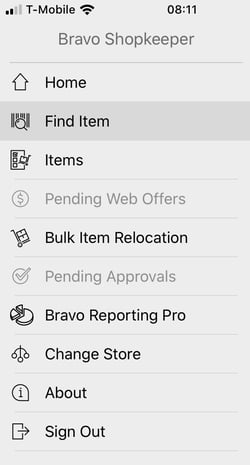
An app menu can be accessed by clicking on the icon in the upper left hand corner of the Find Item screen.

After clicking the menu icon, the menu will appear with the following options: Find Item, Change Store, About, and Sign out.
Bravo Mobile logs users into their home store. To switch stores, click the menu button and select “Change Store” to see a list of all available stores.
The app times out after one hour of inactivity. Users must re-enter their credentials to continue. To sign out, click the menu icon and choose “Sign out” to return to the login screen.
Additional notes:
SKUs are currently not fully supported; if a SKU number is entered, the picture will not be shown and a picture cannot be added.
Push Notifications for Manager Approvals
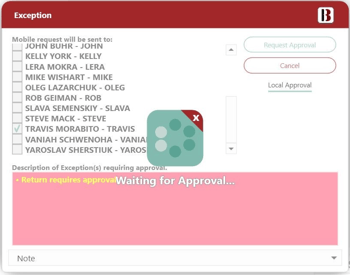
When an exception appears, users now have the option to send that exception to a manager’s mobile device for approval. Simply select Mobile Approval from the Exception dialog to send the request to all eligible users.
If the Choose Associates for Mobile Approvals checkbox is enabled for the store, the person writing the transaction will be able to select the managers to receive the approval request.

The Mobile Approval button will toggle to a Local Approval button just in case the approval needs to be performed from a workstation instead.

On Bravo the associate asking for the approval will see a loading screen with "Waiting for Approval" message. They can cancel the request by hitting the X on the top right of the loading circle.
The Manager(s) will receive a notification of the approval request, which they can open and act on. Sales, Renewals and new Loans have added details to better understand what the approval request is for.
To require Notes when sending a mobile approval, it must be turned on for the store in System Settings:

You must call Support to enable it. See examples of each transaction type below.
Request for Approval for a Sale

See example above. Requests for approval will include;
1) the Customer Rating standing,
2) A description of the item and the option to expand on the item.
3) Detail description. Multiple items can also be included in a request for approval.
4) Notes associates must put in when sending a mobile approval.
Request for Approval for a Renewal
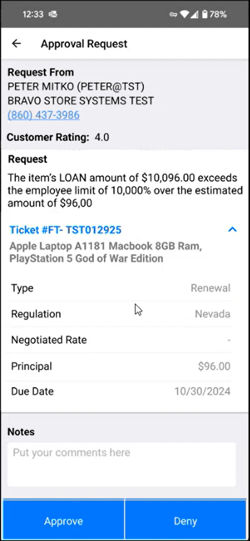
Request for Approval for a new Loan
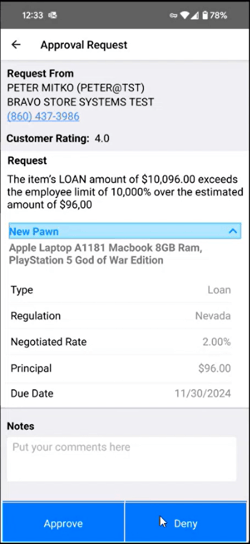
If multiple Managers are notified, the first response will determine the request’s approval or denial. The requesting user will be notified of the approval or denial immediately.
Once the request has been approved or denied by the first Manager, any other Manager will be notified of the initial response if they:
- Attempt to approve/deny the request after it has already been approved/denied.
- They view the approval request after it has already been approved or denied.
Interested in Bravo Mobile - Call 888-407-6287 option 2
Date Updated: 2/21/2025